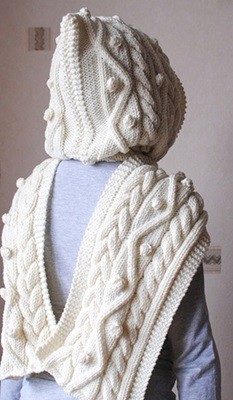
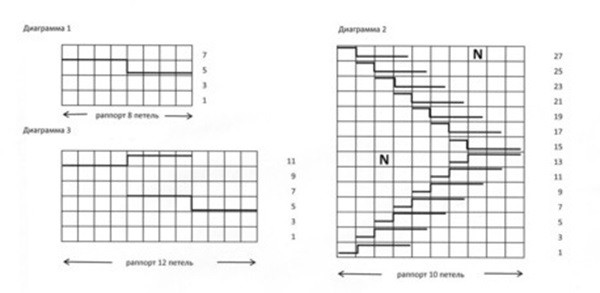
This hooded scarf is knit from the chart shown below. It’s perfect to keep you warm and cozy in bad weather.
Material: Lana Grossa “Mega Stoppino”, 65% wool, 35% acrylic, 500g in Natur (shade 001). 6 mm needles.
Garter stitch: knit every stitch on both right-side and wrong-side rows.
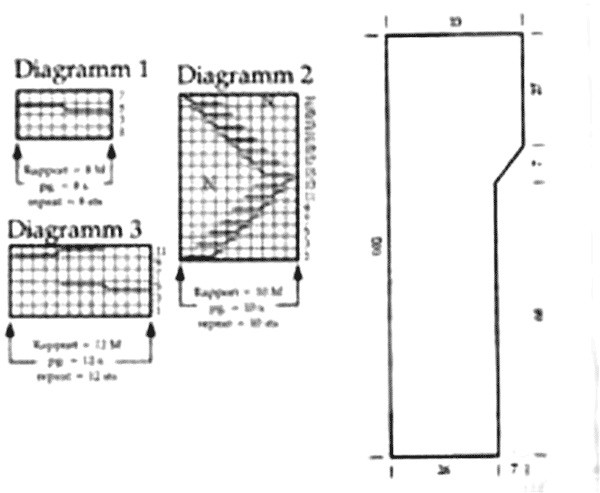
Pattern 1: See Chart 1. Only right-side (RS) rows are shown; on wrong-side (WS) rows, work stitches as they appear. Repeat rows 1-8. One square equals one stitch and 2 rows.
Pattern 2: See Chart 2. Only RS rows are shown; work WS rows as they appear. Repeat rows 1-28. One square equals one stitch and 2 rows.
Pattern 3: See Chart 3. Only RS rows are shown; on WS rows, work stitches as they appear. Repeat rows 1-12. One square equals one stitch and 2 rows.
Stockinette stitch: Knit the RS rows and purl the WS rows.
Reverse stockinette stitch: Purl the RS rows and knit the WS rows. Gauge: 20 sts and 22 rows = 10×10 cm (for Patterns 1-3, 6 mm needles).
Left half of the hood: With 6 mm needles, cast on 51 sts and work in the following sequence: selvage st, 3 sts garter stitch, 2 sts reverse stockinette, 3 sts stockinette, 2 sts reverse stockinette, 8 sts of Pattern 1, 2 sts reverse stockinette, 10 sts of Pattern 2, 2 sts reverse stockinette, 12 sts of Pattern 3, 2 sts reverse stockinette, 3 sts garter stitch, selvage st.
After 68 cm, on a RS row, between the 5th and 6th purl sts before Pattern 1, add 2 more purl sts and finish the row as before. On the next RS row, work as follows:
Selvage st, 10 sts of Pattern 2, 2 purl sts, 8 sts of Pattern 1, 2 purl sts, 10 sts of Pattern 2, 2 purl sts, 12 sts of Pattern 3, 2 purl sts, 3 sts garter stitch, selvage st.
To shape the hood curve: On the RS, on the right side, every other row, decrease 2 sts twice and 1 st six times. After these decreases, work the first 2 sts in reverse stockinette and the rest in stockinette, then bind off the last row of stitches (length 102 cm). Right half of the hood: work as the left half, mirroring the pattern.
Finishing: Lay the pieces flat, dampen them, and let dry. Sew closed the back and top parts of the hood (honestly, the original instructions weren’t very clear here, but it’s best to sew along the stitches so there’s no bulky seam at the crown, or close it with a crochet hook instead). Attach a 15 cm tassel to the tip of the hood. At the ends of the scarf, attach four pom-poms on a 4 cm cord to each end.