Instructions for the chart “Striped Crochet Jacket with Crocodile Stitch Pattern”
Sizes
36/38 (40/42) 44/46
You Will Need
- Caleido yarn (85% baby alpaca, 15% sheep’s wool; approx. 95 m/50 g) – 250 (300) 350 g in a melange white-gray-green-beige, or Caleido Lace yarn (85% baby alpaca, 15% sheep’s wool; approx. 250 m/50 g) – 350 g in melange white-gray-green-beige (color tundra #102)
- size 6 mm circular knitting needles
- 2.5 mm and 4 mm crochet hooks
- 3 metal clasps in antique brass finish
Stitch Patterns and Charts
Stockinette Stitch
Right side rows – knit sts; wrong side rows – purl sts;
when working in the round, knit all sts.
“Crocodile Stitch” Pattern
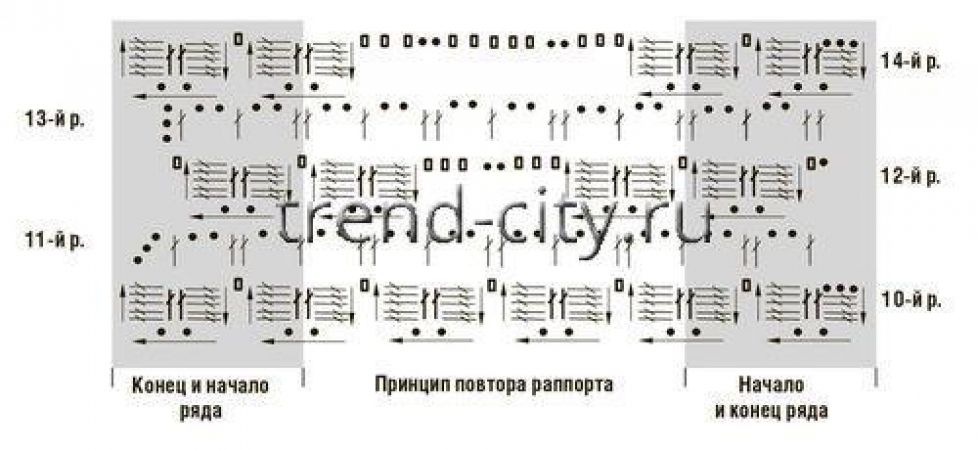
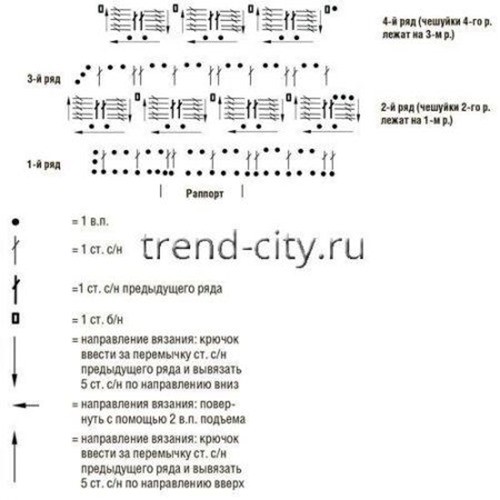
Work with a 2.5 mm hook following the chart.
Garter Stitch
Right side and wrong side rows – knit sts.
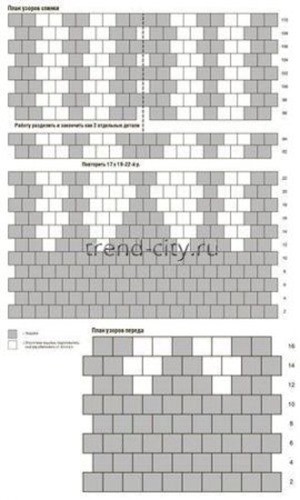
Back Pattern Layout
Gauge
14 sts x 18 rows = 10 x 10 cm, worked in stockinette stitch with 6 mm needles;
36 sts x 9 rows = 10 x 10 cm, worked in “Crocodile Stitch” pattern with 2.5 mm hook.
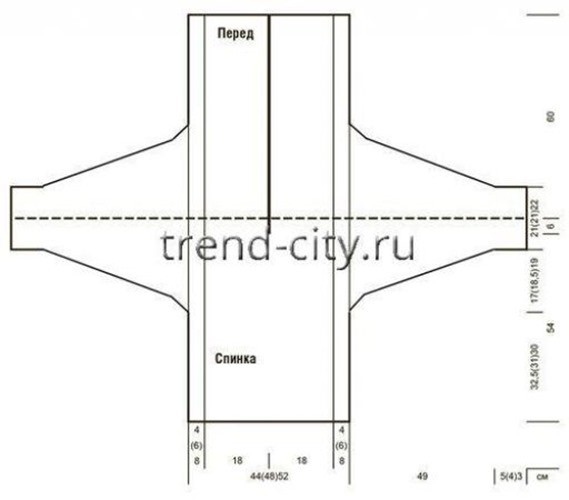
Schematic
Instructions
Back
With a 2.5 mm hook and Caleido Lace yarn, make a starting chain of 134 ch + 3 turning ch.
Work following the first chart as follows:
Row 1 (preparation for row 2 scales): insert hook into the 4th ch counting backward and work 1 dc (3 turning ch replace 1 dc).
Then work * 2 ch, 1 dc, 2 ch, 2 dc *, repeat from * to * 19 times.
Row 2: work row 2 scales onto the dc’s of row 1.
For each scale, work 5 dc separated by 2 ch on the base of 2 dc of the previous row and join with 1 sc into the plain stitch of the previous row. Continuously twist or turn the work as you go.
Turn the work so the dc’s of the previous row lie horizontally. Work 3 ch (replacing 1 dc of the first scale), then work 4 dc into the 1st of the 2 dc of the previous row, 2 ch.
Turn the work and, working in the opposite direction, work 5 dc into the 2nd dc of the previous row.
Join 1 sc to the separate dc of the previous row, * on the base of the 1st of the next 2 dc of the previous row work 5 dc, 2 ch.
Turn the work and, working in the opposite direction, work 5 dc into the 2nd dc of the previous row.
Join 1 sc to the separate dc of the previous row * (= 1 scale). Repeat from * to * 19 times = 20 scales.
Row 3 (preparation for row 4 scales): 3 turning ch, 1 dc into the middle of the scale, * 2 ch, 2 dc into the sc of the previous row, 2 ch, 1 dc into the middle of the scale *. Repeat from * to * 19 times = 19 scales.
Row 4: 1 turning ch, 1 sc, then continue following the row 2 pattern.
The scales should sit offset from each other.
Row 5: work following the row 3 pattern, but at the start of the row work 3 turning ch and 1 dc into the last sc of the previous row.
Row 6: work as row 2;
Row 7: work as row 3;
Row 8: work as row 4;
Row 9: work as row 5.
From this point, work following the second chart and the back pattern layout.
Row 10: work as row 2;
Row 11: work as row 3.
Row 12: 1 turning ch, 1 sc, 2 scales, 2 sc into the 2 ch of the previous row, 2 ch, 2 sc into the 2 ch of the previous row, 1 sc into the next dc (= 3 sc), 3 scales, 2 sc, 2 ch, 3 sc, 5 scales, 2 sc, 2 ch, 3 sc, 3 scales, 2 sc, 2 ch, 3 sc, 2 scales.
Row 13: work as row 5.
Row 14: 3 turning ch replace 1 dc of the 1st scale, 2 scales, 2 sc, 2 ch, 5 sc (into the 2 ch of the previous row, 1 dc, and 2 ch of the previous row), 2 ch, 3 sc, 2 scales, 2 sc, 2 ch, 5 sc, 2 ch, 3 sc, 4 scales, 2 sc, 2 ch, 5 sc, 2 ch, 3 sc, 2 scales, 2 sc, 2 ch, 5 sc, 2 ch, 3 sc, 2 scales.
Row 15: work as row 3.
Row 16: 1 turning ch, 1 sc, 2 scales, 2 sc, 2 ch, 5 sc, 2 ch, 3 sc, 1 scale, 2 sc, 2 ch, 5 sc, 2 ch, 5 sc, 2 ch, 3 sc, 3 scales, 2 sc, 2 ch, 5 sc, 2 ch, 5 sc, 2 ch, 3 sc, 1 scale, 2 sc, 2 ch, 5 sc, 2 ch, 3 sc, 2 scales.
Row 17: work as row 5.
Row 18: 3 turning ch replace the 1st dc of the 1st scale, 2 scales, 2 sc, 2 ch, 5 sc, 2 ch, 3 sc, 2 scales, 2 sc, 2 ch, 5 sc, 2 ch, 5 sc, 2 ch, 3 sc, 2 scales, 2 sc, 2 ch, 5 sc, 2 ch, 5 sc, 2 ch, 3 sc, 2 scales, 2 sc, 2 ch, 5 sc, 2 ch, 3 sc, 2 scales.
Row 19: work as row 3.
Row 20: 1 turning ch, 1 sc, 2 scales, 2 sc, 2 ch, 5 sc, 2 ch, 3 sc, 1 scale, 2 sc, 2 ch, 5 sc, 2 ch, 5 sc, 2 ch, 5 sc, 2 ch, 3 sc, 1 scale, 2 sc, 2 ch, 5 sc, 2 ch, 5 sc, 2 ch, 5 sc, 2 ch, 3 sc, 2 scales, 2 sc, 2 ch, 5 sc, 2 ch, 3 sc, 2 scales.
Row 21: work as row 5.
Row 22: 3 turning ch replace the 1st dc of the 1st scale, 2 scales, 2 sc, 2 ch, 5 sc, 2 ch, 3 sc, 2 scales, 2 sc, 2 ch, 5 sc, 2 ch, 5 sc, 2 ch, 3 sc, 2 scales, 2 sc, 2 ch, 5 sc, 2 ch, 5 sc, 2 ch, 3 sc, 2 scales, 2 sc, 2 ch, 5 sc, 2 ch, 3 sc, 2 scales.
Repeat rows 19-22 another 17 times.
To prepare the neckline division, work rows 91 and 92 as rows 15 and 16, and rows 93 and 94 as rows 13 and 14.
Starting with row 95, divide the work and finish as 2 separate pieces.
Row 95: work as row 3, but only over half the stitches.
Row 96: 1 turning ch, 1 sc, 2 scales, 2 sc, 2 ch, 5 sc, 2 ch, 3 sc, 2 scales.
Row 97: work as row 5.
Row 98: 3 turning ch replace the 1st dc of the 1st scale, 2 scales, 2 sc, 2 ch, 5 sc, 2 ch, 3 sc, 2 scales, 2 sc, 2 ch, 5 sc, 2 ch, 3 sc, 2 scales.
Repeat rows 95-98 another 3 times.
Then work the second half as a mirror image.
Right Front
With a 2.5 mm hook and Caleido Lace yarn, make a starting chain of 64 ch + 3 turning ch and work following the first chart as follows:
Row 1 (preparation for row 2 scales): insert hook into the 4th ch counting backward and work 1 dc (3 turning ch replace the 1st dc).
Then work * 2 ch, 1 dc, 2 ch, 2 dc *. Repeat from * to * 9 times.
Row 2: turn the work so the dc’s of the previous row lie horizontally.
Work 3 ch (replacing the 1st dc of the previous row), then work 4 dc into the 1st dc of the previous row, 2 ch. Turn the work and, working in the opposite direction, work 5 dc into the 2nd dc of the previous row.
Join 1 sc to the separate dc of the previous row, * on the base of the 1st of the next 2 dc of the previous row work 5 dc, 2 ch.
Turn the work and, working in the opposite direction, work 5 dc into the 2nd dc of the previous row.
Join 1 sc to the separate dc of the previous row * (= 1 scale). Repeat from * to * 9 times = 10 scales.
Row 3 (preparation for row 4 scales): 3 turning ch, 1 dc into the middle of the scale, * 4 ch, 2 dc into the sc of the previous row, 2 ch, 1 dc into the middle of the scale *. Repeat from * to * 9 times.
Row 4: 1 turning ch, 1 sc, then continue following the row 2 pattern. The scales sit offset and stacked over each other.
Row 5: work following the row 3 pattern, but at the start of the row work 3 turning ch and 1 dc into the last sc of the previous row.
Row 6: work as row 2.
Row 7: work as row 3.
Row 8: work as row 4.
Row 9: work as row 5.
Row 10: work as row 2.
From this point, work following the second chart and the front pattern layout.
Row 11: work as row 3.
Row 12: 1 turning ch, 1 sc, 2 scales, 2 sc, 2 ch, 3 sc, 3 scales, 2 sc, 2 ch, 3 sc, 2 scales.
Row 13: work as row 5.
Row 14: 3 turning ch replace the 1st dc of the 1st scale, 2 scales, 2 sc, 2 ch, 5 sc, 2 ch, 3 sc, 2 scales, 2 sc, 2 ch, 5 sc, 2 ch, 3 sc, 2 scales.
Row 15: work as row 3.
Row 16: 1 turning ch, 1 sc, 2 scales, 2 sc, 2 ch, 5 sc, 2 ch, 3 sc, 1 scale, 2 sc, 2 ch, 5 sc, 2 ch, 3 sc, 2 scales.
Repeat rows 13-16 another 23 times.
Finish with rows 13 and 14.
Left Front
Work with Caleido Lace yarn as a mirror image of the right front.
Sew the shoulder seams.
Left Side Panel with Sleeve
With Caleido yarn, using 6 mm needles, pick up 84 sts along the right front side edge on the right side, 1 st at the shoulder seam, and 84 sts along the back = 169 sts. Mark the center st (= 85th st) for shoulder decreases.
Work these 169 sts as follows:
Row 1 (wrong side row): 6 knit, 157 purl, 6 knit.
Row 2 (right side row): knit.
Repeat rows 1 and 2 continuously.
At the same time, for the shoulder slopes, work the 3 center sts together with a left-leaning decrease 2 times (first the 84th, 85th and 86th sts = slip 2 sts as if to knit, k1, pass the slipped sts over).
After 4 (6) 8 cm, bind off 44 (42) 40 sts on both sides for the side seam.
Continue working the sleeve on the remaining 77 (81) 85 sts.
For the sleeve shaping, decrease on both sides every 2nd row: 1×3 (4) 4 sts, 1×3 (3) 4 sts, 1×2 (3) 3 sts, 1×2 sts, 1×1 st, then every 6th row 13×1 st = 29 (29) 31 sts.
Continue in stockinette stitch until the side panel measures 53 cm from its start.
Finish with 5 (4) 3 cm of garter stitch.
Right Side Panel with Sleeve
Work to mirror the left side panel with sleeve.
Finishing the Fronts. With Caleido yarn and a 4 mm hook, work an edging around both fronts and the neckline as follows:
Row 1: * before the scale work 1 sc and 1 ch twice, after the scale work 1 sc and 1 ch twice (see side edge on chart, rows 1/2); on the base of the turning ch or dc work 1 sc and 1 ch once (see side edge on chart, rows 3/4) *. Repeat continuously from * to *.
Rows 2 and 3: 1 turning ch, * 1 sc, 1 ch *. Repeat continuously from * to *, ending with 1 sc.
Along the neckline, work 3 sts together.
Neckline
Attach Caleido yarn with a 4 mm hook to the 37th scale.
Row 1: following the main pattern chart, set up stitches for 12 scales (right front), 1 scale (neckline), and 12 scales (left front).
Row 2: work a total of 25 scales following the chart.
Then work “crab stitch” (sc worked left to right) along the edge without forming scales.
Steam the jacket carefully into shape, without letting the iron touch the fabric.
According to the model photo, sew on 3 clasps symmetrically.