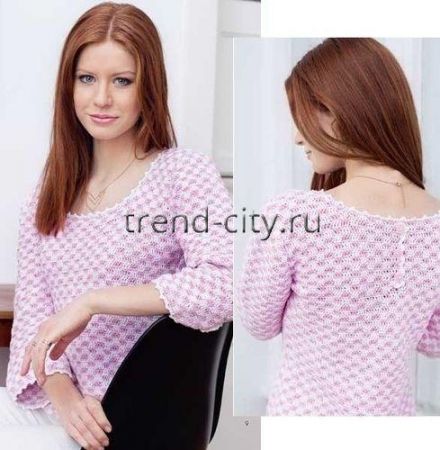
Chart Description: Two-Tone Crochet Pullover with Buttons
Sizes
34/36 (38/40) 42/44
You Will Need
- Yarn (100% cotton; 104 m/50 g) – 400 (450) 450 g white and 350 (400) 400 g pink
- 3.5 mm crochet hook
- 5 pink-and-white checked buttons (size 28).
Stitch Patterns and Charts
Checkered Double Crochet Pattern
The number of starting stitches is a multiple of 6.
Row 1: with pink yarn work 3 turning chains instead of the 1st dc and 2 dc, * with white yarn work 3 dc, with pink yarn work 3 dc, repeat from * across, ending with 3 dc in white.
Row 2: work as row 1, but shift the colors.
Repeat rows 1 and 2 continuously, working into the back loop only on right-side rows and into the front loop only on wrong-side rows of the previous row. Work from several balls of yarn, and when changing color, work the last dc of the previous color with the new color. Carry the unused yarn along the wrong side of the work and catch it in as you work.
Tip: you can also work double crochets around the unused yarn in the following row so there are no long floats on the wrong side of the work.
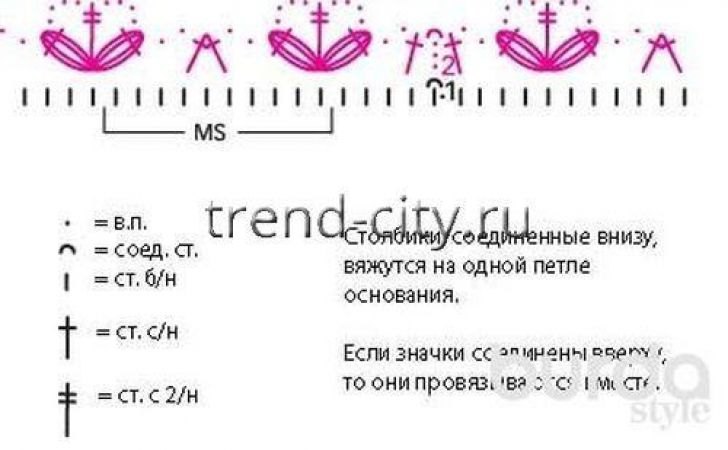
Border
The starting number of stitches is a multiple of 10.
Work according to the chart. Repeat the pattern repeat continuously, and work the transition of the round as shown on the chart.
Work rounds 1 and 2 once.
Gauge
22 sts x 8.5 rows = 10 x 10 cm, worked in checkered pattern.
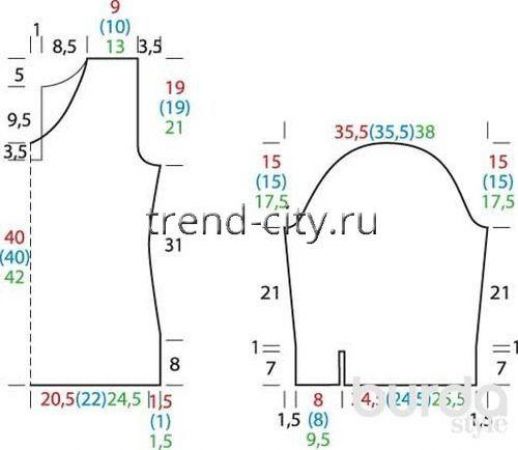
Schematic
Instructions
Front
With pink yarn, make a chain of 96 (102) 114 sts + 3 turning chains and work in pattern 1. After 8 cm from the starting row, decrease 1 st on both sides for shaping, then decrease 2 x 1 st every 3rd row = 90 (96) 108 sts.
After 24 cm from the starting row, increase 1 st on both sides, then increase 2 x 1 st every 3rd row = 96 (102) 114 sts.
After 39 cm from the starting row, bind off 6 sts on both sides for the armholes, then decrease 2 x 1 st every following row = 80 (86) 98 sts. After 43.5 (43.5) 45.5 cm from the starting row, bind off the center 32 sts for the neckline and finish both sides separately. For the inner curve, decrease 1 x 2 sts and 3 x 1 st every following row. On the remaining 19 (22) 28 shoulder sts, finish work after 58 (58) 60 cm from the starting row.
Back
Work the same as the front, but with a slit and a higher neckline. To do this, after 40 (40) 42 cm from the starting row, leave the center 4 sts and continue working the right half first.
After 53 (53) 55 cm from the starting row, bind off 14 sts on the inner edge for the neckline, and for shaping decrease 2 x 2 sts and 1 x 1 st every following row. Then continue working the left half; for the planned button placket, work a chain of 4 sts and continue working in pattern 1 across all 38 (41) 47 sts = 42 (45) 51 sts.
Work the armhole decreases as a mirror image, but on the 1st decrease also decrease an additional 4 sts of the button placket.
Right Sleeve
Begin the sleeve worked in 2 parts.
For the right part, with pink yarn make a chain of 54 (54) 57 sts + 3 turning chains and work in pattern 1, ending with 3 dc in pink for size 3. After 7 cm = 6 rows from the starting row, set the work aside.
For the left part, with pink yarn make a chain of 18 (18) 21 sts + 3 turning chains and work in pattern 1, beginning with 3 dc in white for size 3.
After 7 cm = 6 rows from the starting row, bring the right part back into work and continue working across all 72 (72) 78 sts as one piece according to the pattern.
After 8 cm from the starting row, increase 1 st on both sides for the sleeve slant, then increase 2 x 1 st every 6th row according to the pattern = 78 (78) 84 sts.
After 29 cm from the starting row, bind off 6 sts on both sides for the sleeve cap, then decrease 6 (6) 8 x 1 st, 4 x 2 sts, and 2 x 3 sts every following row. On the remaining 26 (26) 28 sts, finish work after 15 (15) 17.5 cm from the start of the sleeve cap shaping.
Left Sleeve
Work the same as the right sleeve, but as a mirror image.
Finishing
Work picot edging in white yarn along the lower edge and slit edge of the back placket (= * 3 sc, 3 ch, 1 sc in the 1st ch, repeat from *).
Sew the placket to the slit edge on the right half of the back.
Sew the seams. Set in the sleeves, easing the sleeve cap slightly at the shoulder.
Work picot edging in white yarn around the neckline and sleeve edges, including the slits.
For the loop fastenings, attach yarn at the lower end of the slit on the wider part of the sleeve, work a chain of 5 sts, skip 1.5 cm of the edge, and attach the chain to the edge of the slit again.
Work the lower edge in white yarn in pattern 2.
Sew 1 button to the lower end of each slit on the narrow parts of the sleeves. Sew 3 buttons, evenly spaced, to the button placket on the back.