Instructions for the chart “Tunisian Crochet Jacket”
Sizes
38/40 (42/44)
You Will Need
- yarn (70% natural wool, 30% polyacrylic; 165 m/100 g) – 600 g multicolor space-dyed
- size 6 mm Tunisian crochet hook with cord
- 7 buttons (about 2 cm diameter)
Stitch Patterns and Charts
Basic Tunisian Stitch Pattern
Each row consists of 2 steps – a forward pass and a return pass. Work only on the right side of the fabric.
Start with a chain of the required number of ch + 1 starting ch.
1st forward pass: pick up 1 loop from the 2nd chain from the hook and from each following chain, leaving all loops on the hook.
1st and all following return passes: yarn over once, then work off 2 loops together across the row until only 1 loop remains on the hook at the end of the row. This loop becomes the first loop of the next row.
2nd and all following forward passes: pick up 1 loop through each following vertical bar of the previous row, leaving it on the hook. For the last loop, insert the hook and pull up through the last vertical bar. Always keep the stitch count constant.
Tip: if you pull the last loop through the last vertical bar together with the bar behind it, you get a more stable edge.
Ribbing
Start as for the basic Tunisian stitch pattern, but from the 2nd forward pass on, work this and all following forward passes as follows: * 1 purl stitch (= hold the working yarn in front of the work, insert the hook into the vertical bar of the previous row, catch the yarn from above and pull through), 1 knit stitch (= insert the hook into the vertical bar of the previous row and bring it out to the wrong side through the fabric, pull the yarn through), repeat from * across.
Woven (Diamond) Pattern
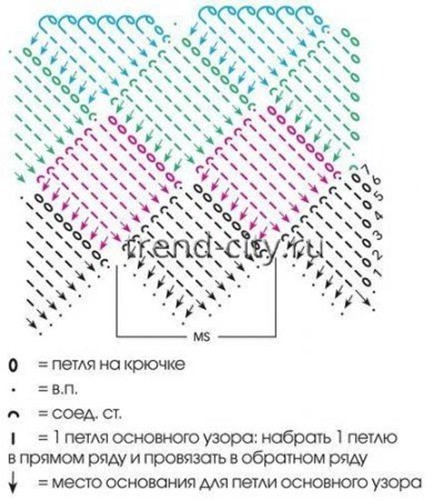
The number of stitches in the starting row is a multiple of 14 + 3. Work according to the chart as follows:
1st Row of Squares
Right Triangle
1st forward and return pass: insert the hook into the 2nd chain from the hook, catch and pull up the yarn, insert the hook into the next chain, catch and pull up the yarn. Then work off the 3 loops on the hook as follows: yarn over and pull through 2 loops, yarn over again and pull through the remaining 2 loops.
2nd forward and return pass: insert the hook into the vertical bar of the loop just worked, catch and pull up the yarn. Then increase 1 stitch as follows: insert the hook into the side bar of the last loop of the previous row, catch and pull up the yarn. Finally insert the hook into the next unworked starting chain, catch and pull up the yarn. Then work off the 4 loops on the hook as described above, 2 loops at a time.
3rd forward and return pass: insert the hook through the vertical bars of the next 2 loops just worked, catch and pull up the yarn. Work 1 increase as before, likewise insert the hook into the next unworked chain and pull the yarn through. Then work off the 5 loops as described above.
4th forward and return pass: insert the hook through the vertical bars of the next 3 loops just worked, catch and pull up the yarn, work 1 increase, and pick up 1 loop through the next chain. Then work off these 6 loops.
5th forward and return pass: pick up 1 loop through each of 4 vertical bars, work 1 increase, and pick up 1 loop through the next chain. Then work off these 7 loops. 6th forward and return pass: pick up 1 loop through each of 5 vertical bars, work 1 increase, and pick up 1 loop through the next chain. Then work off these 8 loops.
After these 6 rows, finish the triangle with slip stitches as follows: first work 1 extra chain (skipping the 1st loop), then work 1 sl st into each of the 6 vertical bars. Work 1 sl st into the next unworked chain as well.
1st Square
1st forward and return pass: keeping the loop on the hook, pick up 1 loop from each of the next 7 chains, then work off the 8 loops on the hook according to the instructions.
2nd forward and return pass: pick up 1 loop through each of 6 vertical bars, pick up the 8th loop from the next unworked chain, then work off the loops.
3rd-7th forward and return pass: work as row 2.
After these 7 rows, finish the 1st square with slip stitches according to the triangle instructions.
Work the next 4 squares the same as the 1st.
On the last 8 chains, work only the left triangle. To do this, start with 1 sl st into the next chain and pull up 1 loop from each of the remaining 7 chains. Work off all loops according to the instructions. In the 2nd-5th forward and return pass, always work the loops only through the vertical bars. Work off the last 3 loops according to the instructions, pull the yarn through and fasten off.
2nd Row of Squares
1st forward and return pass: attach the yarn to the top loop of the right triangle of the 1st row of squares = 1st loop. Pick up the next 6 loops from the 6 worked loops of the triangle. Pick up the 8th loop from the 1st row of the adjoining square. Then work off the loops.
2nd-5th forward and return pass: pick up 1 loop through each of 6 vertical bars, pick up the 8th loop from the next row of the adjoining square, and work off these 8 loops. After
row 6, finish the square as before with slip stitches. Work the next squares the same way.
3rd Row of Squares
Right Triangle
1st forward and return pass: attach the yarn to the top side loop of the right triangle of the 1st row of squares and work 1 chain = 1st loop. Pick up 1 loop from the chain, pick up 1 loop from the 1st row of the adjoining square. Then work off these 3 loops.
2nd-5th forward and return pass: work as for the right triangle in the 1st row of squares, but always pick up the last loop from the next row of the adjoining square.
Then work the squares and left triangle according to the instructions and chart.
For the following rows of squares, always repeat the 2nd + 3rd rows of squares.
Gauge
- 13 sts x 10 rows = 10 x 10 cm, worked in basic Tunisian stitch pattern and ribbing;
woven (diamond) pattern:
- 1 square of 8 sts and 6 rows = 6 x 6 cm
- diagonal = 8.5 cm.
Note! The sleeve pattern measurements were taken from the model.
Schematic

Instructions
Back
With the Tunisian hook, make a chain of 49 (55) ch + 1 starting ch and work in ribbing.
After 15 cm from the starting row, continue in basic Tunisian stitch pattern, increasing 15 sts evenly in the 1st row = 64 (70) sts.
After 15 cm from the start of the basic pattern, bind off 1 st on each side for the armholes, then 4 x 1 st every 5th row = 54 (60) sts.
After 33 cm from the start of the basic pattern, leave the center 12 sts for the neckline and finish both sides separately.
For the inner curve shaping, decrease 1 x 3 sts, 3 x 2 sts and 2 x 1 st in every following row.
On the remaining 10 (13) shoulder sts, finish work after 40 cm from the start of the basic pattern.
Left Front
Make a chain of 27 (30) ch + 1 starting ch and work in ribbing.
After 15 cm from the starting row, continue on the first 22 (25) sts of the ribbing in the basic pattern, increasing 5 sts evenly, and continue the last 5 sts in ribbing for the button band = 32 (35) sts.
Work the armhole decreases on the right edge as for the back.
At the same time, after 28 cm from the start of the basic pattern, leave 5 sts for the neckline on the left edge, then decrease 1 x 4 sts, 3 x 2 sts and 2 x 1 st in every following row.
On the remaining 10 (13) shoulder sts, finish work at the same height as the back.
Right Front
Work the same as the left front, but mirrored and with 6 buttonholes. To do this, bind off the center stitch of the ribbing on a forward pass and skip it on the return pass, working 1 chain. On the next forward pass, increase 1 stitch each from this chain and from the last worked chain (= 2 sts on the forward pass) and work them back into the pattern. Work the 1st buttonhole 2 cm from the starting row, and the rest at 6 cm intervals.
Sleeves
For each sleeve, make a chain of 73 ch and work in the woven (diamond) pattern = 4 squares + 2 edge triangles.
For the sleeve cap, after 7 rows of squares, start the following rows with 1 full square respectively, that is, no longer work edge triangles on either side, but work the rows according to the chart (red markers) or the 2nd row of squares instructions. This creates a slant on both sides (see also the schematic).
After 10 rows of squares from the starting row, finish with the last square.
At the lower end of the sleeve, fill in the corners of the starting edge with triangles. To do this, turn the sleeve 180° and work along the left edge of the triangle or square, working 8 loops in the basic Tunisian stitch technique used for the woven pattern. In each return pass, attach the yarn at the beginning with 1 sl st to the adjoining square and work off the last 3 loops together at the end. In the following forward and return passes, work 1 loop less each time and, after working off the last 3 loops, finish with 1 sl st into the tip of the adjoining square or edge triangle.
For the cuffs, work along the lower edges of the sleeves, working 28 sts in ribbing.
After 14 cm of ribbing, finish the work.
Finishing
Sew the seams and set in the sleeves.
Work 3 cm of ribbing around the neckline edge, including the short sides of the bands, and above the right band, 1 cm up the band, work the 7th buttonhole.
Sew on the buttons.