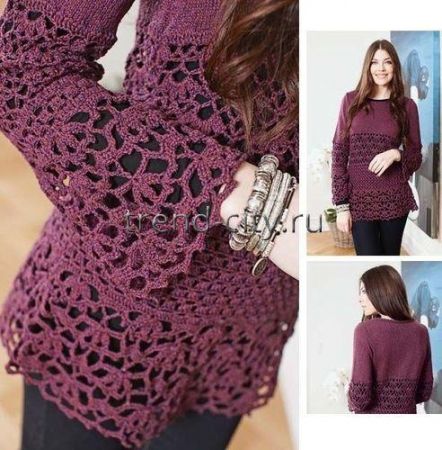
Instructions for the “Tunic with Lace Inserts” Chart
Sizes
S (M) L (XL)
Bust width: 82 (91) 100 (108) cm
Length: 68 (70) 72 cm (74)
You Will Need
- yarn (58% silk, 42% cotton, 50 g/195 m) – 8 (8) 9 (10) skeins of dark purple
- 2.5 mm circular knitting needles, 40 cm long
- 3 mm circular knitting needles, 80 cm long
- 3 mm double-pointed needles
- crochet hooks size 2 and 2.5 mm
Patterns and charts
Gauge
25 sts x 33 rows = 10 x 10 cm, worked in stockinette stitch with 3 mm needles,
25 dc = 10 cm.
Important: if the instructions give only one number, it applies to all sizes.
Note! The upper part of the garment is worked in the round on circular needles up to the armholes.
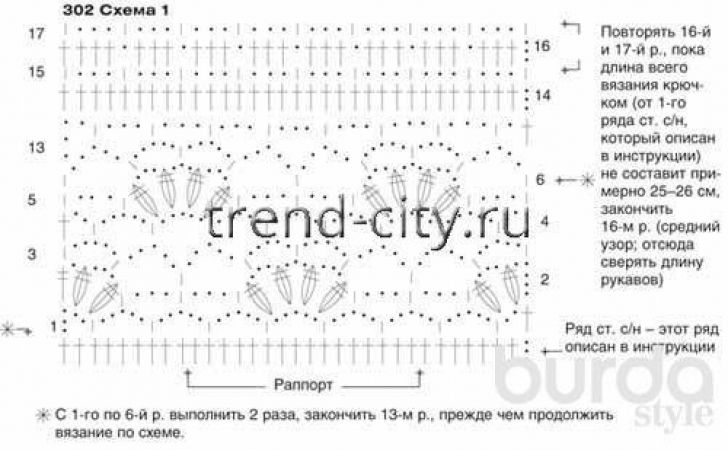
Charts
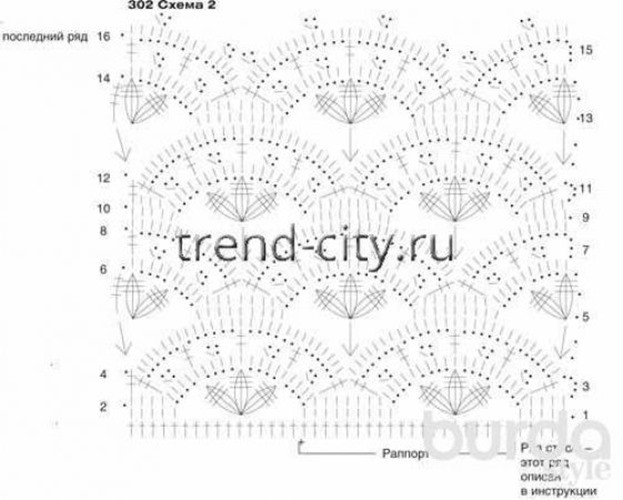
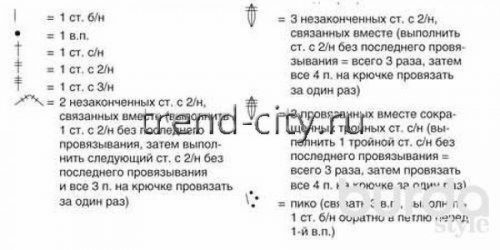
Instructions
Cast on 206 (228) 250 (272) sts on 3 mm circular needles, work row 1 in purl and continue working in the round in stockinette stitch.
Important: mark the “side seam” lines with contrasting yarn at the beginning and middle of the round until the start of the armholes.
When the piece measures 7 (8) 9 (10) cm, divide the sts at the markers and work each half separately = 103 (114) 125 (136) sts for each part.
Back
Mark the center back and on both sides at the beginning of each row bind off first 3, 2, 2 sts, then decrease for the armholes every 2nd row as follows: k1, k2tog, work to the last 3 sts on the needle, slip one st, knit the next st, and pass the slipped st over the knit st, k1.
When 79 (84) 89 (94) sts remain on the needle, work even. When the armhole depth reaches 20 (21) 22 (23) cm from the marker, bind off the center 39 (40) 41 (42) sts for the neckline and finish both sides separately.
For the neckline curve, bind off from the inner edge at the beginning of the next two rows 3, 2 sts. At the same time, bind off from the outer edge for the shoulder slope at the beginning of each row 5, 5, 5 (5, 6, 6) 6, 6, 7 (7, 7, 7) sts.
Front
Work as for the back, but with a deeper neckline. Bind off the armhole sts as for the back.
When 13 cm remain to be worked before the last bound-off sts of the shoulder slope (check against the back), bind off the center 15 (16) 17 (18) sts for the neckline and finish both sides separately.
For the neckline curve, bind off from the inner edge at the beginning of each row 4, 3, 3, 2, 1, 1, 1 sts, then bind off 1 st at the beginning of every 2nd row until 15 (17) 19 (21) sts remain on the needle.
Finish the shoulder slope as for the back, and bind off the sts.
Sleeves
Cast on 82 (88) 94 (100) sts on 3 mm double-pointed needles (distribute the sts evenly over 4 needles), work row 1 in purl and continue working in the round in stockinette stitch.
When the sleeve measures 7 (8) 9 (10) cm, work decreases for the cap as described for the back, but decrease 1 st first 4 times every 4th row, then continue decreasing every 2nd row until 34 (36) 38 (44) sts remain on the needle.
Bind off on both sides at the beginning of each row 2, 3, 4 sts, and bind off the remaining sts in one row.
Work the second sleeve the same way.
Finishing
Sew the shoulder seams. Sew in the sleeves so that no puckers form at the top of the cap.
Neckline Edging
Work on 2.5 mm circular needles from the right side of the garment (carry the working yarn along the wrong side). Start at the right shoulder seam and pick up 7-8 sts along the curved edge of the back neckline, then 1 st from each bound-off center st, plus another 7-8 sts along the curved edge. On the straight sections of the left front, pick up 1 st from each row, skipping every 5th row; where 1 st was bound off, pick up 1 st from each bound-off st up to 2 bound-off sts. From there, and on all sections with bound-off sts, pick up 1 st from each bound-off st. Pick up sts along the right front neckline edge the same way (the total number of sts must be divisible by 4). Work 1 row in purl and bind off knitwise in the next row.
Lace Panel of the Back
Work in rows back and forth; the number of sts must be a multiple of 16 + 1 st.
With a 2.5 mm hook, work sc around the lower edge of the upper back, working 1 sc in each st. For size S, work 2 sc in the same st 8 times (evenly spaced) = 113 sts,
for size M, skip 1 st once at the beginning of the row = 113 sts,
for size L, work 2 sc in the same st 4 times (evenly spaced) = 129 sts,
for size XL, work 2 sc in the same st 9 times (evenly spaced) = 145 sts.
Continue working from Chart 1. After finishing Chart 1, continue with Chart 2. First work a row of dc to adjust the stitch count to 121 (121) 141 (141) sts. Finish the piece by working Chart 2 to the end.
Lace Panel of the Front
Work the same as for the back.
Lace Panel of the Sleeves
Work in rows back and forth; the number of sts is a multiple of 16 + 1 st.
With a 2.5 mm hook, work sc around the lower edge of the sleeve, working 1 sc in each st. For this,
for size S, skip 1 st once = 81 sts,
for size M, skip 1 st 7 times = 81 sts,
for size L, work 2 sc in the same st 3 times (evenly spaced) = 97 sts,
for size XL, skip 1 st 3 times = 97 sts.
Continue with Chart 1. After finishing Chart 1, work Chart 2. First work a row of dc to adjust the stitch count, increasing by 0 (0) 4 (4) sts = 81 (81) 101 (101) sts.
Crochet Edging for the Neckline Trim
With a 2 mm hook work 1 sc, 4 ch and 1 dc back into the same st as the sc, *skip 2 sts and work a sl st in the next st, 4 ch and 1 dc back into the same st as the sl st*, repeat from * to *, join the round with a sl st.
At the end, sew the side seams and the sleeve seams.