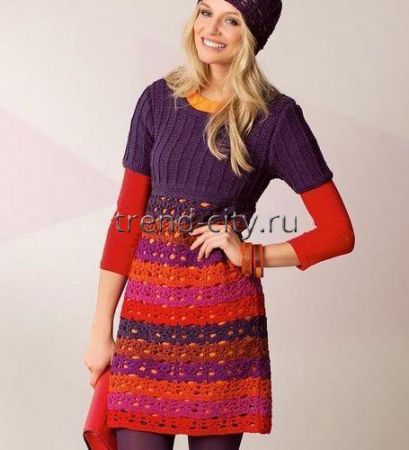
Instructions for the Striped Crochet Tunic Chart
Sizes
36/38 (42/44) 46/48
You Will Need
- Yarn (60% natural wool, 40% polyacrylic, 120 m / 50 g) – 250 (350) 400 g purple, plus 100 g each of orange, rust, red, violet, and cyclamen
- Size 5.5 mm knitting needles
- Size 5.5 mm circular knitting needles
- 4.5 mm crochet hook
Stitch Patterns and Charts
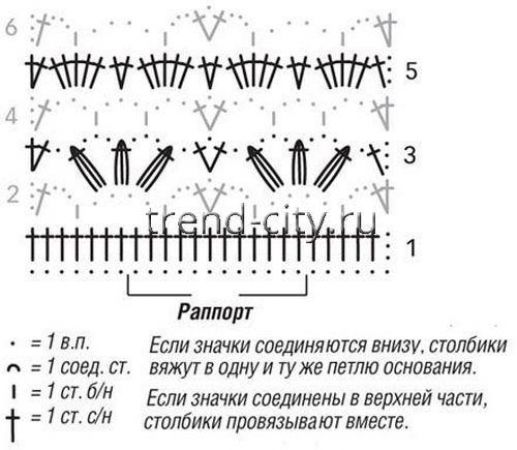
Arch Stitch Pattern
Number of starting stitches is a multiple of 12 + 1.
Work according to the chart. Begin each row with 3 turning chains instead of the first dc, and with the stitches before the repeat; repeat the pattern repeat continuously, and end with the stitches after the repeat.
Work rows 1–6 once, then repeat rows 3–6 continuously.
Note: starting from row 2, work the dc and sc stitches only around the chain of the previous row. The starting and ending stitches in the instructions are calculated as 1/2 pattern repeat.
Color Sequence
5 rows purple, then * 4 rows each of rust, violet, orange, cyclamen, red, purple, repeat continuously from *.
Garter Stitch
Both right-side and wrong-side rows: knit stitches.
Reverse Stockinette Stitch
Right-side rows: purl stitches; wrong-side rows: knit stitches.
Band Pattern
3 rows garter stitch, starting with 1 wrong-side row, then 2 rows reverse stockinette stitch = 5 rows total.
Main Pattern
Number of stitches is a multiple of 5 + 2 edge stitches. Begin and end each row with 1 edge stitch.
Right-side rows: * 2 purl, slip 1 stitch as if to purl (yarn in back), 2 purl, repeat continuously from *.
Wrong-side rows: work all stitches as they appear; work slipped stitches as purl.
Gauge
17 starting sts x 8.5 rows = 10 x 10 cm, worked in arch stitch pattern,
18.5 sts x 28 rows = 10 x 10 cm, worked in main pattern.
Note: first crochet the skirt panels. Then knit the upper part directly onto the starting row of the skirt panels. Arrows on the schematic = direction of work.
Schematic
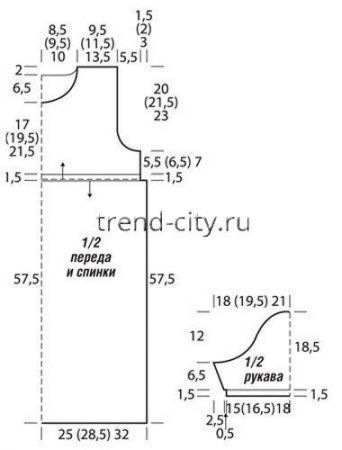
Instructions
Back
For the skirt panel, using purple yarn, chain 85 (97) 109 + 3 turning chains and work in the arch stitch pattern following the color sequence = 6 (7) 8 repeats + 1/2 repeat on each side. End the work after 57.5 cm = 49 rows from the starting row.
With purple yarn, pick up 87 (97) 107 sts from the starting row onto the needles and work 1.5 cm = 5 rows in band pattern. Continue in main pattern.
After 5.5 (6.5) 7 cm from pattern 4, bind off 4 sts on both sides for the armholes, then 2 x 2 sts and 2 x 1 st every 2nd row = 67 (77) 87 sts.
After 23.5 (26) 28 cm from the main pattern, bind off the center 25 (29) 31 sts for the neckline and finish both sides separately.
For shaping the inner edge, bind off another 1 x 3 sts on the following 2nd row.
After 25.5 (28) 30 cm from the band pattern, bind off the remaining 18 (21) 25 shoulder sts.
Front
Work as for the back, but for a deeper neckline, already after 17 (19.5) 21.5 cm from the main pattern, bind off the center 17 (21) 23 sts, then 2 x 2 sts and 2 x 1 st every 2nd row, then bind off another 1 x 1 st on the following 4th row.
Sleeves
With purple yarn, cast on 55 (60) 65 sts for each sleeve and work 1.5 cm = 5 rows in main pattern for the cuff, increasing 2 sts evenly in the last row = 57 (62) 67 sts. Continue in main pattern.
At the same time, for the sleeve taper, increase alternately on both sides every 2nd and 4th row from the cuff 5 x 1 st according to the pattern = 67 (72) 77 sts.
After 6.5 cm from the cuff, bind off 4 sts on both sides for the sleeve cap, then 1 x 2 sts and 4 x 1 st every 2nd row, then 2 x 1 st every 4th row, and again 3 x 1 st, 2 x 2 sts, 1 x 3 sts, and 1 x 4 sts every 2nd row.
After 18.5 cm from the cuff, bind off the remaining 15 (20) 25 sts.
Finishing
Sew the shoulder seams.
With purple yarn, pick up 94 (104) 110 sts around the neckline onto circular needles and work 4 rounds purl for the band. Then bind off all stitches knitwise.
Sew in the sleeves, sew the side seams and sleeve seams.