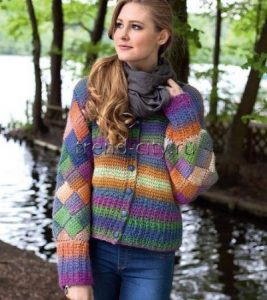
Instructions for the Pink Crochet Tunic
Sizes
40/42 (48/50)
You Will Need
- Yarn (47% cotton, 47% polyacrylic, 6% polyamide, 165 m/50 g), 400 (500) g pink
- Size 3.5 mm and 4 mm crochet hooks
Stitch Patterns and Charts
Main Pattern
The starting chain must be a multiple of 3 + 2 sts.
Work following Chart 1. Begin each row with 3 turning ch instead of the first dc, work the sts before the repeat, repeat the pattern repeat continuously, and end with the sts after the repeat.
Work rows 1–3 once, then repeat rows 2+3 continuously; from row 2 on, always work the dc between the dc of the previous row.
Important: 1 repeat = 2 dc worked into the same base st; individual dc are marked in the text as dc.

Lace Pattern
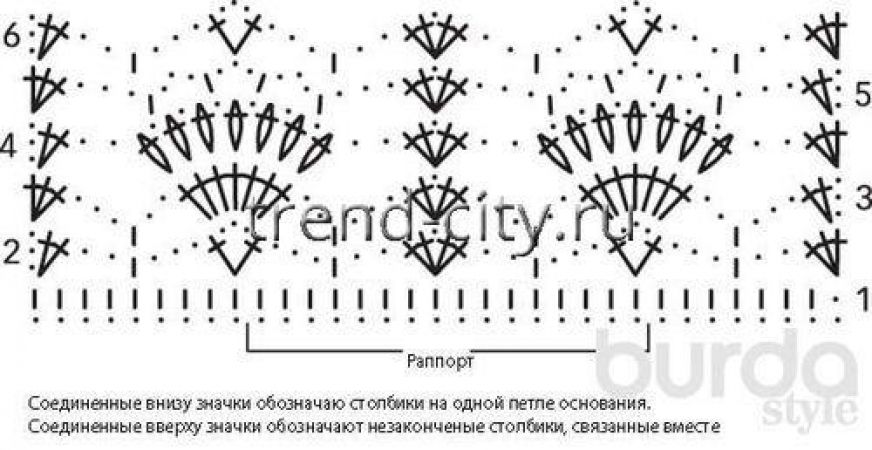
The starting number of sts must be a multiple of 16 + 1.
Work following Chart 2. Begin each row with 1 or 3 turning ch instead of the first sc or first dc, work the sts before the repeat, repeat the pattern repeat continuously, and end with the sts after the repeat.
Work rows 1–6 once, then repeat rows 3–6 continuously.
The starting and ending sts are marked in the text as 1/2 repeat.
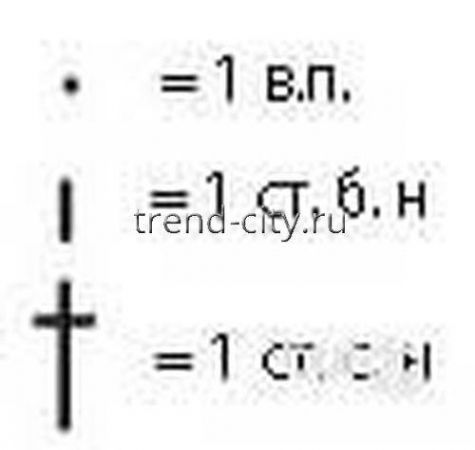
Symbol Key
Gauge
25.5 starting sts x 10 rows = 10 x 10 cm, worked in main pattern with a 3.5 mm hook,
20 starting sts x 8.5 rows = 10 x 10 cm, worked in lace pattern (4 mm hook).
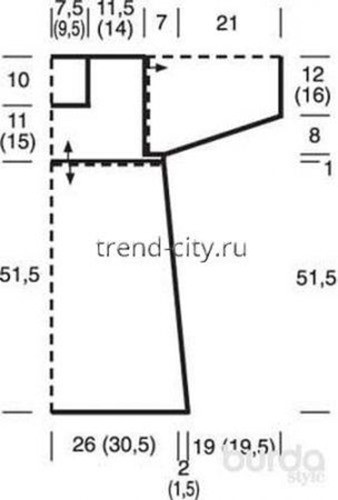
Important! Work the lower part of the tunic from the top down, picking up sts directly along the lower edge of the upper part. Arrows on the schematic = direction of work.
Schematic
Instructions
Back
For the upper part, using a 3.5 mm hook make a starting chain of 134 (155) ch + 3 turning ch and work in main pattern = 44 (51) repeats + 1 dc on each side.
After 1 cm from the starting chain, leave 6 repeats unworked on each side for the armholes (at the beginning of the row skip them with sl sts, at the end leave the sts unworked) = 32 (39) repeats + 1 dc on each side.
After 21 (25) cm from the starting chain, end the piece; the middle 12 (15) repeats + 1 dc on each side form the neckline, and the outer 9 (11) repeats + 1 dc on each side form the shoulders.
Work the lower part of the tunic in lace pattern with a 4 mm hook, picking up sts along the starting chain; in row 1 work 113 (129) sc = 6 (7) repeats + 1/2 repeat on each side.
After 51.5 cm = 44 rows, finish the lace pattern.
Important: at first the stitch count of the lace pattern stays the same, but increases as the piece grows taller. This is shown on the schematic as a side slant.
Front
Work as for the back, but with a deeper neckline. To do this, after only 11 (15) cm from the starting chain, leave the middle 12 (15) repeats + the dc on each side unworked, and finish both sides separately to the same height as the back.
Sleeves
Work the sleeves from the top down. First, sew the shoulder seams. Work the vertical armhole edges in lace pattern; in row 1 work 81 (97) sc = 4 (5) repeats + 1/2 repeat on each side.
For the sleeve shaping, at a sleeve height of 8 cm = 7 rows, evenly decrease 1 repeat on each side over the following 16 rows = 2 (3) repeats + 1/2 repeat on each side.
At a sleeve height of 28 cm = 24 rows, finish the piece.
Finishing
Sew the sleeve edges along the 7 cm horizontal armholes.
Sew the side seams and sleeve seams.
Work 1 round of picot edging around the neckline with a 3.5 mm hook as follows: attach yarn, work 1 turning ch instead of the first sc, * work 1 picot (= 3 ch, 1 sc into the first ch) around 1 cm of the edge, 1 sc, repeat from * continuously; at the end, work 1 sl st into the turning ch instead of the last sc.