Instructions for the Oriental Style Crochet Tunic Chart
Sizes
36/38 (40/42) 44/46
You Will Need
- Yarn 1 (100% cotton, 160 m/50 g) – 150 (200) 200 g bright pink, and Yarn 2 (58% viscose, 42% cotton, 115 m/50 g) – 150 (200) 200 g bright pink
- 3 mm and 3.5 mm crochet hooks
- 65 clear bright pink faceted beads
- 65 flat clear bright pink sequins and 65 flat clear colorless sequins
Stitch Patterns and Charts
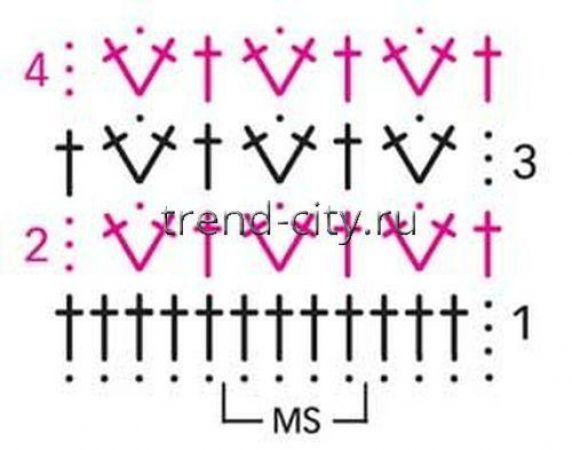
Main Pattern
The number of starting chain stitches is a multiple of 4 + 1.
Work according to Chart 1. Start with the stitches before the repeat, repeat the repeat continuously, and end with the stitches after the repeat.
Work rows 1–4 once, then repeat rows 3–4.
Fan Pattern
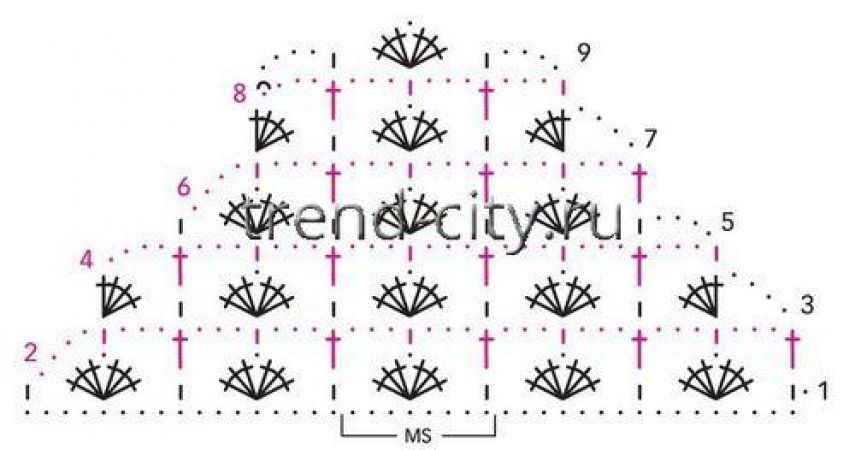
The number of starting chain stitches is a multiple of 8 + 1. Work as for the main pattern, but following Chart 2.
Work rows 1–3 once, then repeat rows 2–3 continuously, continuing the decreases on both sides in the same manner.
Symbol Key
Gauge
22 sts of starting row x 9.5 rows = 10 x 10 cm, worked in main pattern,
23 sts of starting row x 11 rows = 10 x 10 cm, worked in fan pattern.
Both swatches were worked with a 3.5 mm hook.
Important! The fan pattern will stretch slightly lengthwise when worn. The size on the schematic was measured from the piece laid flat on a horizontal surface.
Schematic
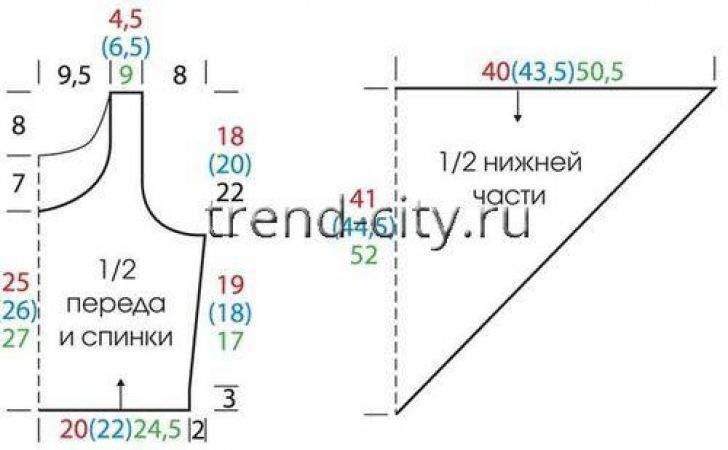
Instructions
Back
With Yarn 1, chain 89 (97) 109 sts + 3 turning ch and work in main pattern.
After 3 cm from the starting row, increase 1 st on both sides for the side shaping, then 3 x 1 st every 4th row as set = 97 (105) 117 sts.
After 22 (21) 20 cm from the starting row, leave 6 sts unworked on both sides for the armholes, then decrease 5 x 2 sts and 2 x 1 st every 2nd row = 61 (69) 81 sts.
At the same time, after 32 (33) 34 cm from the starting row, leave the center 25 sts (= 6 repeats + 1 st for symmetry) unworked for the neckline, and finish both sides separately.
For the neckline curve, leave 4 x 2 sts unworked on the inner edge every following row.
After 40 (41) 42 cm from the starting row, finish off the remaining 10 (14) 20 sts.
Front
Work the same way, but for a deeper neckline, start the decreases earlier, after 25 (26) 27 cm from the starting row.
Lower Part
With Yarn 2, chain 185 (201) 233 sts + 1 turning ch and work in fan pattern. Finish off after 41 cm = 45 rows (44.5 cm = 49 rows) 52 cm = 57 rows from the starting row.
Finishing
Sew the right side seam.
Sew the starting row of the lower part to the lower edge of the upper part, stretching or easing the width of the lower part slightly as needed.
Sew the left side seam and the shoulder seams.
Edge the neckline and armholes with a 3 mm hook and Yarn 1: one round of single crochet, then one round of crab stitch (= single crochet worked from left to right).
Attach 1 tassel to every 2nd stitch of the slanted edges of the lower part (= 1 strand each of Yarn 1 and Yarn 2, 38 cm long).
If desired, thread 3 beads onto 2 strands of each tassel and knot the ends of the strands several times.