
Instructions for the chart “Lace Camisole Top on Thin Straps”
Sizes
S/M (L)
Bust circumference: 90 (100) cm
Garment length: 50 (51) cm
You Will Need
- yarn (54% cotton, 32% viscose, 14% linen, 50 g/150 m) – 4 (5) skeins of undyed yarn
- size 3 mm crochet hook
Stitch Patterns and Charts
3 tr Worked Together
Work 1 tr, leaving the last step so 2 loops remain on the hook, then work another tr, leaving 3 loops on the hook, then work another tr, stopping when 4 loops are on the hook, then yarn over and draw through all 4 loops on the hook.
Picot
Ch 3, 1 sc in the 1st chain.
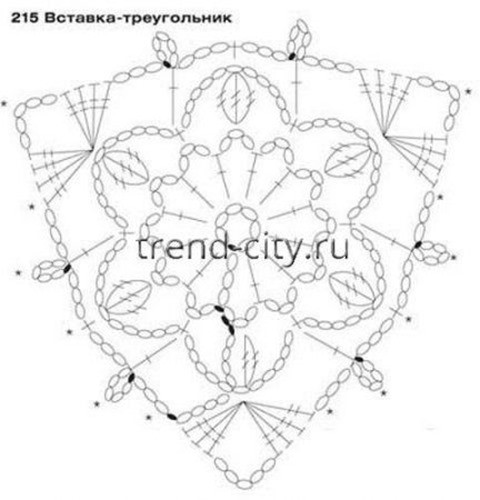
Lace Triangle Insert
Work according to the chart.
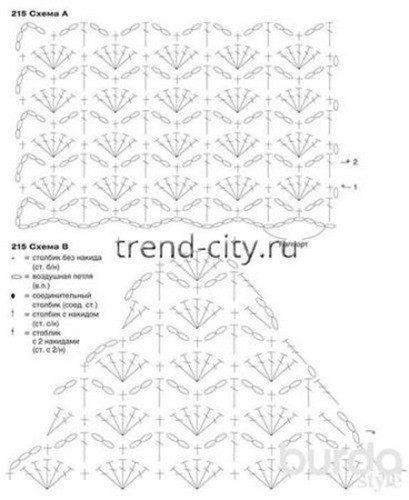
“Shells” Stitch Pattern
See also charts A and B.
Make a starting chain (multiple of 6 sts).
On the starting chain (= WS row), work: 1 sc in the 9th ch from hook, *ch 2, skip 2 ch, 1 dc in next ch, ch 2, skip 2 ch, 1 sc in next ch*
Repeat from * to *, ending with ch 2, skip 2 ch, 1 dc in last stitch.
Row 1 (= RS row): ch 1 (turning chain), 1 sc in dc, *5 dc in sc, 1 sc in dc*. Repeat from * to *, ending with 5 dc in sc, 1 dc in the 3rd (last) chain of the row.
Row 2: ch 5 (turning chain), *1 sc in the middle of 5 dc, ch 2, 1 dc in sc, ch 2*. Repeat from * to * to the end of the row, but do not work into the last 2 chains of the row.
Repeat Rows 1 and 2.
Gauge
4 “shells” = 10 cm
Instructions
Front
First crochet the lace triangle insert according to the chart. Then make a chain of 114 (126) sts and work in pattern A following chart A and the instructions = 18 (20) “shells” wide.
When the piece measures 18 cm (end with Row 2), divide the work in the middle and in the next row work 9 (10) “shells”.
Then work 1 sc in dc, inserting the hook through one point of the triangle (into the middle of the 5 chains) at the same time so that the triangle is attached to the front.
Turn and work the left side of the front separately.
Continue working in pattern A, decreasing at the inside edge as shown on the left part of chart B (repeat Rows 2 to 5 of the chart).
Important: at this stage, do not decrease at the outside edge! While working the front, continue attaching the lace insert to it, working 1 slip stitch into a stitch of the insert at the end of every 2nd row (see the points marked with * on the chart). When the insert has been attached along one side (= 6 (7) “shells” wide at this point), end with Row 2 of the pattern, leaving 1 (2) outer “shells” unworked for the armhole.
Finish the left side of the front following chart B, now decreasing on both sides.
Work the remaining stitches of the last “shell”.
Work the other side of the front the same way, but mirrored, i.e. work the inside-edge decreases following the right part of chart B.
When it is time to bind off stitches for the armhole, end with Row 1 and leave 1 (2) “shells” unworked at the end of the row.
Finish following chart B, decreasing on both sides. Work the remaining stitches of the last “shell”.
Back
Work as for the front, but without the lace triangle insert. Begin shaping the armholes at the same height as on the front. Leave 1 (2) “shells” unworked on each side.
Decrease on both sides as shown on chart B until the back length equals the front length. Work the remaining stitches.
Trim
Sew the side seams. Join the yarn with a slip stitch to the back at the right side seam and work in the round:
Row 1: ch 4, *work 2 dc, ch 2, 2 dc in the same stitch as the sc, ch 1, 1 dc in the same stitch as the dc of pattern A, ch 1*. Repeat from * to *, ending with 2 dc, ch 2, 2 dc in the same stitch as the sc, ch 1, join the round with a slip stitch to the 3rd of the 4 chains.
Row 2: ch 4, *work 2 dc, ch 2, 2 dc in the ch-2 space, ch 1, 1 dc in dc, ch 1*. Repeat from * to *, ending with 2 dc, ch 2, 2 dc in the ch-2 space, ch 1, 1 slip stitch in the 3rd of the 4 chains.
Repeat Row 2 two more times.
Row 5: ch 1, *work 1 dc, picot, 1 dc, picot, 1 dc, picot, 1 dc, picot, 1 dc in the ch-2 space, 1 sc in dc*. Repeat from * to *, work the last sc into the 3rd of the 4 chains.
Straps
Make chains and work a row of sc around them. Attach the straps to the front and back.
Edging
Work 1 row of sc around the armhole edges, the back neckline, and the slanted front edges up to the insert.