
Instructions for the Chart “Crochet Top with Center Border”
Sizes
36/38 (40/42) 44/46
You Will Need
- yarn (75% cotton, 25% linen, 98 m/50 g) – 450 (500) 500 g white
- 3.5 mm crochet hook
- 1.2 m blue-and-white checked satin ribbon, 1 cm wide
Stitch Patterns and Charts
Main Pattern
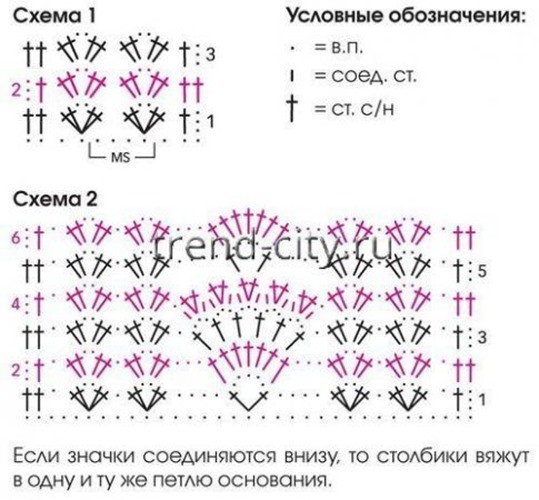
The number of stitches in the starting row is a multiple of 4 + 3. Work according to Chart 1.
Start with the stitches before the repeat, repeat the pattern repeat continuously, and end with the stitches after the repeat.
Work rows 1–3 once, then repeat rows 2 + 3 continuously.
Border
Work on 33 stitches of the starting row according to Chart 2.
Work rows 1–6 once, then repeat rows 3–6 continuously.
Gauge
18.5 sts of the starting row x 7.75 rows = 10 x 10 cm, worked in the main pattern,
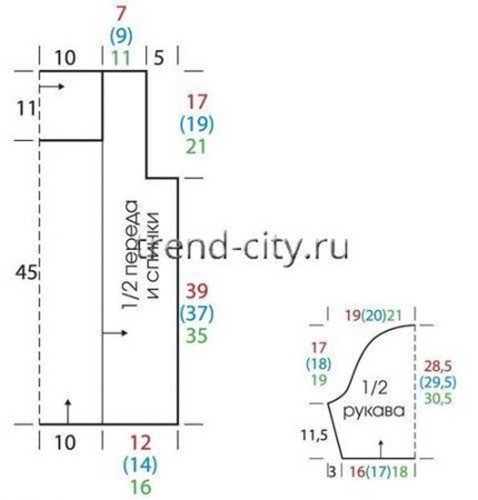
border = 20 cm wide, 40 rows = 45 cm.
Note! The back is worked in 2 pieces from the center outward. For the front, first work the border and edge it on both sides with the main pattern.
Schematic
Instructions
Back
For the right half of the back, make a chain of 103 ch + 3 turning ch and work in the main pattern. After 17 (19) 21 cm from the starting row, for the right armhole bind off along the left edge 17 (19) 21 cm.
After 22 (24) 26 cm from the starting row, finish the piece.
Work the left half of the back the same way, but mirrored, by working along the starting row of the right half with the main pattern.
Front
Make a chain of 33 ch + 3 turning ch and work the border. After 45 cm = 40 rows from the starting row, finish the piece.
For the left part of the front, work along the right edge of the border with 2 rows of sc, starting with 1 wrong-side row at the upper right edge of the border and working 81 sc.
At the end of row 2 (= right side row), work an additional 22 ch and 3 turning ch and continue working on all 103 stitches in the main pattern.
After 7 (9) 11 cm from the start of edging, shape the armhole along the left edge as on the back.
After 12 (14) 16 cm from the start of edging, finish the piece.
Work the 2nd side of the border the same way, but mirrored.
Sleeves
For each sleeve, make a chain of 59 (63) 67 ch + 3 turning ch and work in the main pattern.
After 2.5 cm from the starting row, increase for the sleeve slant on both sides 1 dc, and in every following row 5 x 1 dc.
After 11.5 cm from the starting row, bind off for the sleeve cap on both sides 3 cm, and in every following row 11 (12) 13 x 1 cm and 1 x 2 cm.
Finish the remaining stitches after 17 (18) 19 cm from the start of the sleeve cap shaping.
Finishing
Sew the seams and set in the sleeves.
Edge the sleeve and neckline edges without a border with 1 round/row of picot (= * 1 sc, 3 ch, 1 sc in the 1st ch, 1 sc, repeat from * continuously).
Cut the satin ribbon in half, thread it through the 1st row of the main pattern on the sleeves, and tie a bow.