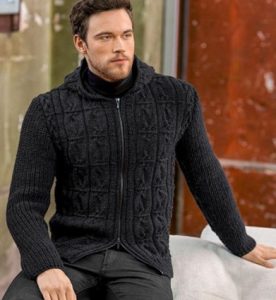

Size 44
You will need:
- 1 kg of light green “Legenda” yarn (50% acrylic, 50% cotton, 100 g/350 m), held double;
- 3.5 mm crochet hook;
- 36 wooden beads, 0.8 cm in diameter.
Stitches Used
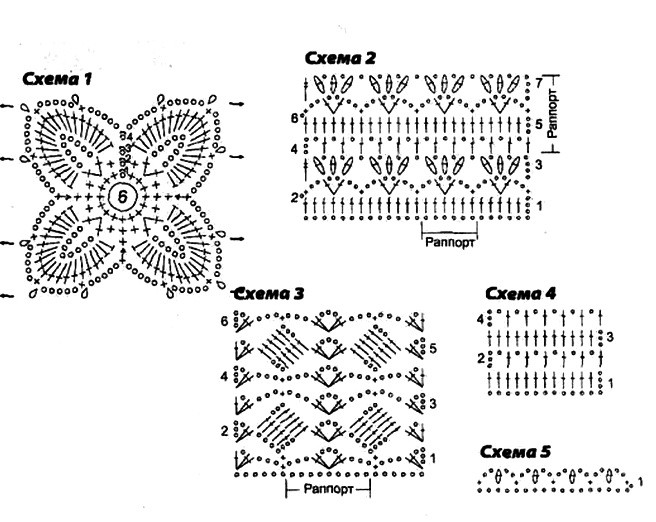
Single crochet (sc); double crochet (dc); half double crochet (hdc); motif from chart 1; patterns from charts 2, 3 and 4; edging from chart 5.
Gauge
Motif size from chart 1 = 14 x 14 cm. 16 sts x 7 rows = 10 x 10 cm, worked in pattern from chart 2.
15 sts x 6 rows = 10 x 10 cm, worked in pattern from chart 3.
16 sts x 8 rows = 10 x 10 cm, worked in pattern from chart 4.
Instructions
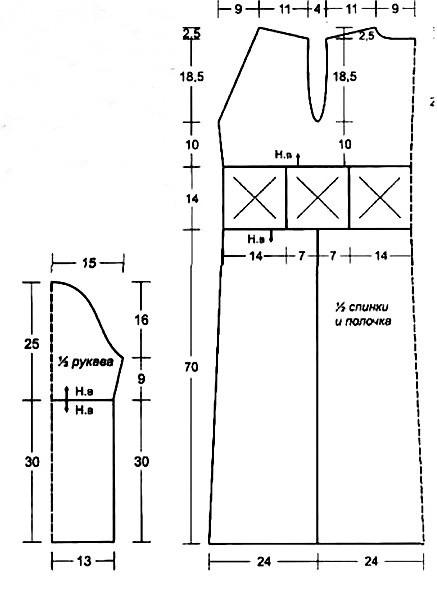
Crochet 6 motifs from chart 1, joining them into a strip during the last round. Then work the back and fronts as one piece, working upward. Along the long side of the motif strip, crochet 23 motifs from chart 2.
After working 7 rows from chart 2, work the back over the center 11 pattern repeats.
After working 13 rows of the back, leave the center 4 pattern repeats for the neckline and finish both halves separately. On the left shoulder stitches, work row 4 in the pattern from chart 2; work the next row as follows: from the neckline, work 7 dc, 2 hdc, 3 sc, and finish off.
Finish the second half as a mirror image.
For the LEFT FRONT, work over 5 pattern repeats from chart 2.
To shape the neckline curve, leave 1/2 pattern repeat unworked on the left side every 2nd row, 4 times.
Shape the shoulder slope as for the back.
RIGHT FRONT: Work as a mirror image of the left.
LOWER PART: On the back, over the section of the 2 center motifs from chart 1 and 1/2 motif from chart 1 on each side, work 8 pattern repeats from chart 3.
After working 42 rows from chart 3, finish off. On the left front, work 4 pattern repeats from chart 3, work 42 rows, and finish off.
Work the bottom of the right front the same as the left.
LEFT SLEEVE: Chain 39 sts + 3 turning chains and work in the pattern from chart 4.
For the sleeve taper, increase 1 st on both sides in every row, 5 times. After working 7 rows from the start, for the sleeve cap decrease on both sides as follows: once by 6 sts, 8 times by 1 st, 3 times by 2 sts, and finish off.
Then along the bottom of the sleeve, work 4 pattern repeats from chart 3. After working 18 rows from chart 3, finish off.
RIGHT SLEEVE: Work as the left.
FINISHING: Steam-press all pieces. Sew in the sleeves and sew the sleeve seams.
Along the neckline and along the front edges, work the edging from chart 5.
Edge the bottom of the sleeves and the coat with 1 round of single crochet.
For the ties, make 6 cords. For one cord, chain a length of 40 cm; thread 3 beads onto each end of the cord and secure them. Use the cords to cinch the side seams, using 3 cords for each seam.
For the front ties, make one cord 1.35 m long from chain sts, and a second cord 40 cm long.
Thread 3 beads onto each end of the short cord, and 6 beads onto each end of the long cord, and secure them. Use the ties to cinch the front, following the photo.