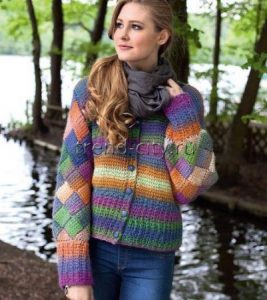


Size: 42-44
The pattern is crocheted.
You will need:
- for the cardigan: 320 g of fine mercerized cotton (50 g/250 m) in soft light blue;
- for the bralette: 70 g of the same yarn;
- 2 mm crochet hook;
- 6 small bright blue buttons.
The straight-silhouette cardigan is worked in a combination of lace patterns in the directions shown in figure 1. The main fabric is worked in a small lace pattern following chart 1. The side edges of the fronts and back, as well as the neckline plackets, are worked in an openwork ladder pattern – the placket pattern: row 1: dc, row 2: *1 dc, 1 ch*, row 3: dc. The bottom of the cardigan is edged with a textured lace floral pattern following chart 1a (2 vertical repeats). The bottom of the sleeves is finished with a textured lace floral pattern following chart 1a (5 vertical repeats). The flared flounce at the sleeve hem is created by modifying the pattern.
Order of work:
Crochet the fronts and back following chart 1. Steam the pieces.
Cardigan schematic and stitch chart:
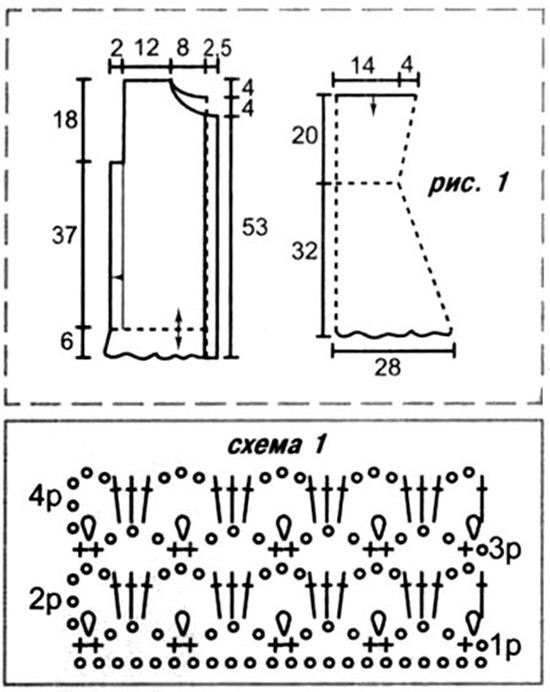
Sew the shoulder seams along the top chain stitches.
Work along the side edges with a row of sc, then 1 row of dc, then work a row of *dc, 1 ch* up to the start of the armhole; fasten off and cut the yarn, leaving a tail long enough to sew the side seams. Carefully sew the top chains of the filet mesh row to the dc row using the working yarn, leaving the armhole section open.
Edge the bottom of the cardigan following chart 1a.
Edging chart for the lace cardigan (1a):
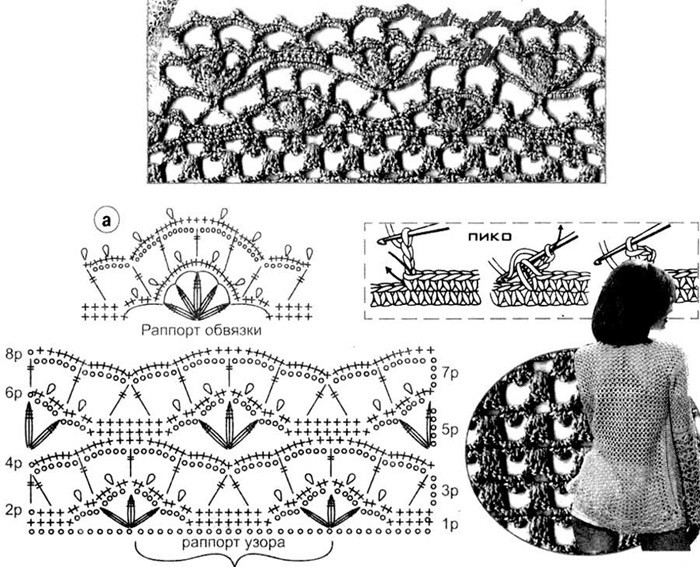
Crochet the upper part of the left sleeve in turned rows on the armhole edging stitches following chart 1, arranging the pattern symmetrically about the center and decreasing stitches at the edges according to the schematic. There are 11 vertical repeats in total. Work the ladder placket pattern, then 5 repeats of chart 1a, and finish with the edging repeat. Work the right sleeve the same way.
Edge the neckline with a row of sc, then work 2 rows of dc.
Work the front plackets, making 6 buttonholes by working 3 ch over 3 dc of the previous row on the right front placket. Finish the plackets and neckline with a crab stitch (reverse sc) edge.
Steam the sleeves by pinning the points of the flounce face down onto the schematic, placing a pin in each picot. Lightly steam the cardigan on the wrong side and sew on the buttons.
The bralette is worked in two separate pieces (cups) joined to each other during the edging process; the bottom is finished with 1 vertical repeat of textured lace following chart 1a. Each cup is worked in dc in turned rows on a chain of 25 sts, edged on both sides (9 rows total in each direction from the center). To shape the dart and give the cup its form, work 5 dc into the top stitch in each row. Next, work 2 rows, repeating twice *3 dc, 3 ch, 3 dc* into the top stitch of the cup. Then work 4 full repeats at the base of each cup on the inside – the 3rd edging row; cut and fasten off the yarn. When working the 3rd edging row of the second cup, join the 3-ch arches together with sc. Fasten off and cut the yarn.
Attach the yarn to the lower corner of the bralette, work 1 row of sc along the bottom edge, gathering the bottom of the cup slightly, then edge the top of the cups as follows: 2 sc, a picot over 4 stitches of the previous row*. Move on to edging the bottom without breaking the yarn, working sc up to the start of the solid part of the cup. Then work 4 lace motifs following chart 1a, working 13 sc instead of 9 in the center. Make 1 vertical repeat. Cut the yarn.
Crochet the ties to the desired length – chains edged with 1 row of sc.
Steam and sew on the ties. Lightly steam the finished bralette.