Искусственное состаривание дерева – популярная техника декорирования для придания обстановке оттенка благородной старины. «Видавшая виды» мебель идеально подходит для многих стилевых решений в интерьере: шебби шик, кантри, рустик, винтаж, прованс, бохо, примитивизм.
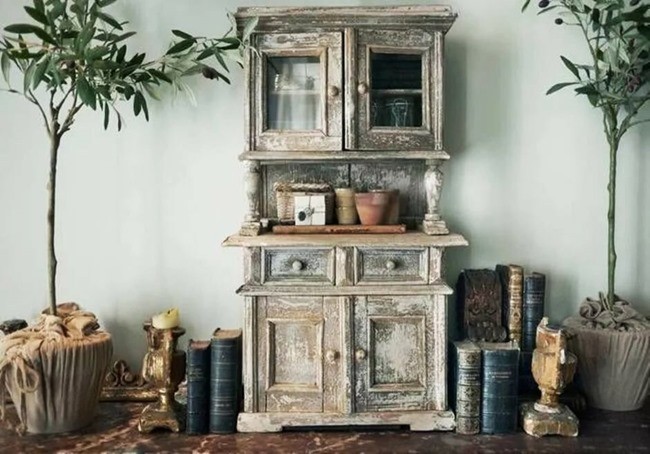
В пошаговых видео уроках на сайте FreeHandmade.com собраны лучшие способы состаривания мебели своими руками с подробными инструкциями.
Proper Distressing Techniques
Before starting your project, it is essential to learn a few important theoretical points:
- how to age wood using mechanical methods,
- how to choose sandpaper and the correct sequence of grits to use,
- the benefits of using antiquing colorants and stains,
- how to mix paints and alter the hue of your colorant,
- how to create a naturally darkened, time-worn surface effect,
- which varnish is best suited for primitive, country, and shabby chic styles.
Whitewashing: Aging Wood
To create the impression of whitewashed wood, you don’t necessarily need to use standard painting techniques. This master class shows what a DIY whitewashed board (color wash effect) looks like. If you want to replicate a barn board—giving the impression of darkened, weathered, and whitewashed wood—paint it with unthinned acrylic paint or soak it with wood stain. The key is ensuring the base background is dark.
DIY Shabby Chic Scuffs and Chipping
Shabby chic is a popular interior design trend that originated in the UK in the 1980s. These techniques can be applied to both homemade and brand-new furniture, as well as any charming wooden interior decor pieces in rustic or vintage styles. The look of peeling or chipped enamel is incredibly easy to create using wax or petroleum jelly (Vaseline). Simply apply the product under the paint layer, dry it with a hairdryer, and wipe the spots with a cloth to reveal the wood underneath.
Multi-Color Layering
- Create a rich undertone base (such as brown, burgundy, or orange).
- Select a few complementary topcoat shades.
- Mist the surface lightly with water and smooth the top enamels on with a spatula, layering them one by one.
- Polish the surface with a stiff sponge to remove any clumps.
- You can go over the piece with white paint using a dry brush technique for added texture.
- Seal the piece with a clear matte glaze.
Repainted Wood Effect
Here is another method for artificially aging wood, perfect for a primitive country style. It utilizes two coating colors: a dark base and a light contrasting topcoat. This creates the special effect of an old surface that has been repainted twice. Despite the apparent simplicity of the technique, there are specific secrets to applying the second contrasting color. The goal is to minimize time and effort during sanding so that one color bleeds over the edges of the other, allowing the distressed base to peek through naturally. If you apply the contrasting tone completely and then try to sand it off, it will be very difficult not to accidentally sand right through the base coat as well.
DIY Crackle Finish (Craquelure)
To create decorative cracks (craquelure), you need two types of paint: a base coat and a top main shade. A crackle medium (special varnish) acts as the layer in between, causing the topcoat to fracture as it dries. The depth and size of the cracks depend on the thickness of the top layer. There is also an option that doesn’t require the crackle medium if you purchase a specialized crackle-effect topcoat paint. For easy maintenance (allowing for both dry and damp cleaning), it is best to seal the finished piece with a standard water-based varnish.
Wood Brushing (Wire Brushing)
This method harmonizes best with the rustic style (a European variation of the well-known country style). It emphasizes naturalness and highlights the imperfections of the wood’s form. The most frequently used color palette for this is gray and white.
- Use a wire brush to remove the soft, fine wood fibers, exposing the grain.
- Apply a white, high-solid polyurethane primer.
- Sand the surface to remove any raised fuzz or splinters.
- Brush on a varnish mixed with a gray pigment.
- Wipe away the excess with a cloth until you achieve the desired aged effect.
How to Create Scratches on Furniture
The Provence style is a variation of “rustic” design that conveys the atmosphere of everyday life in the French countryside. It is commonly used to decorate country houses, small apartments, and cozy coffee shops. A distressed dresser, wardrobe, or bedside table is an absolute must-have. The simplest method is to completely cover the item with a solid layer of light-toned paint, and then strategically distress the coating in certain areas using a sander or a wire brush. Scratches and heavy wear look most natural on handles, edges, and corners.
Furniture Decoupage
Ordinary newspaper is a wonderful material for decorating and is currently very popular for wall designs. For furniture decoupage, pages from glossy magazines, wallpaper scraps, and vintage sheet music look incredibly harmonious. Decoupage paired with custom acrylic painting creates a highly original look. Before gluing and painting, it is crucial to properly prepare the surface: remove the old varnish using sandpaper, an orbital sander, or a chemical paint stripper.
Gradient Antiquing and Glazing
The fronts of kitchen and living room cabinets often have interesting carved details or paneling that you want to highlight. Traditional flat painting dulls the sense of volume and surface texture. On the other hand, large scuffs made with a sanding block or sandpaper can look too rough and don’t suit every interior. A great compromise is working with color glazing: darkening the recesses and tinting the raised areas with a lighter shade. When the lower shadow layer subtly shows through the paler topcoat, it creates a beautiful gradient with smooth, elegant transitions.
Besides furniture, you can test your creative skills on smaller items (like a jewelry box or a photo frame). This is an excellent way to practice and get the hang of the techniques before moving on to more serious design experiments.