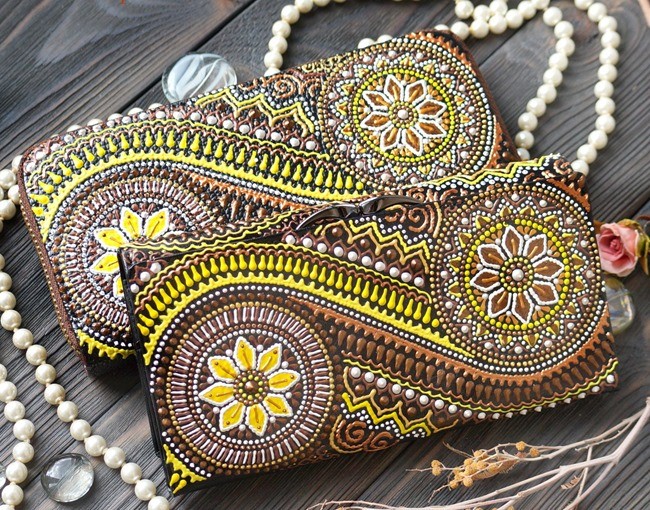
Painting is a popular type of decoration. One of the most interesting, bright, and unique techniques is dot painting (dot art), which dates back to Persian and Indian traditions. Initially, the method of applying paint was called dripping because the pigment was dripped from straws. Impressionist artists used a similar method, creating canvases in the style of “pointillism”. Today, dot drawings are used to decorate objects, clothing, and interiors.
We invite crafters to independently master the dot painting method from scratch using our free video tutorials and master classes with step-by-step patterns for beginners.
What Materials You Will Need
https://youtube.com/watch?v=vBE1GoAs7zk
- Outliner acrylic paints in tubes. Unlike regular paints that give a flat drawing, these have a 3D effect due to their thick consistency. The advantage of the tube is a long, thin nozzle, which is convenient for dotting without additional tools (brushes, dotting tools, etc.). This produces small, voluminous dots.
- Paints called “liquid pearls” are also sold in tubes and do not require an additional tool for application. They produce larger drops, imitating semi-circular beads.
For the simplest drawing, two shades are enough (contrasting ones will look better). Over time, the palette can be expanded infinitely: you can purchase shades of different saturation and depth, pearlescent and matte, pastel or with a “metallic” effect.
Dot Painting Technique
Hold the outliner tube in your hand like a pen: grasping it with three fingers and holding it approximately in the middle. Bring it to the decorated surface perpendicularly or with a slight tilt. Under a strong tilt, the dots will overlap and merge into a single line. The drawing hand should rest on the table, but with caution to avoid smudging un-dried areas. Keep a paper towel, sponge, or rag nearby to periodically wipe away the paint accumulated on the tip of the tube.
How to Practice and Get the Hang of It
Immediately starting to paint your favorite item is a reckless step. A beginner will almost certainly ruin the work with smudges, blurred spots, and asymmetry. First, you need to practice in a few different ways.
- In a regular squared notebook, hone your skill of placing dots at equal distances. The optimal placement: 4 small dots or 1 large dot per square.
- Move on to a blank sheet of paper and create dotted lines using the same principle.
- Draw test pictures on colored cardboard. You can find reference patterns and templates on the Internet.
Elements of Dot Painting
The simplest element is straight lines. They can be made of more concentrated dots placed closely together, or conversely, spaced further apart. A more complex and interesting variation involves gradual transitions from small to large dots within a single line.
Double and triple lines with dots arranged in a staggered (checkerboard) pattern provide dense canvas coverage and a rich design.
Zigzags, meanders, and waves allow you to create fantasy patterns, various types of braids and borders, adding variety to the composition.
Modified dot shapes (drops, commas) add texture and depth, making the work look more complex and professional.
The Working Process: All Steps
The process consists of several stages:
- Degreasing with a sponge moistened in an alcohol-based solution. A well-cleaned surface of the item is the key to the durability of the decoration. To keep the material degreased until the end of the work, it is recommended to wear gloves.
- Transferring the sketch through a stencil using a transparent contour gel. The elements are outlined with a thin and flat line.
- Drawing with colored outliners, starting with large details, then moving to smaller ones. You can use a hairdryer for faster drying.
- Varnishing. This is done 24 hours after applying the decoration. A single layer of varnish is enough to preserve the drawing in its original form for many years.
Fantasy Patterns Using Stencils
https://youtube.com/watch?v=tiiLyWpKVuE
It is convenient to use stencils for an even fantasy ornament. Templates with cutouts in the shape of any patterns can be bought or made by yourself. In the second case, you will have to remember your childhood and cutting paper snowflakes. Stencils are made on a similar principle: a folded sheet is cut in random places, and when unfolded, you get a perfectly symmetrical composition. Your art will turn out even, without the center shifting.
Dot Painting Pattern Variations
Patterns can be easily found on the Internet. Among the variety of samples, several groups stand out noticeably.
- Geometric ornament – the simplest for beginners, featuring only strokes broken at different angles and geometric shapes (squares, triangles, circles).
- Floral motifs – leaves, twigs, flowers. These require more experience and skill.
- Fantasy patterns – interlacing of different elements in one piece of art. They may resemble Indian mehndi, fantastic flowers, etc.
- Lace imitation – performed with white or beige paint and resembles a delicate lace fabric.
- Simple drawings – animals, cartoon characters, silhouettes of insects and birds, space objects, and household items.
What Can Be Decorated
Based on the purpose of acrylic outliners (for fabric and leather, wood and plastic, glass and paper), any household item can be decorated. Usually, women’s accessories are popular choices: passport covers, wallets, clutch bags, phone cases. The second group of items is tableware: plates and mugs, glasses, and jars for loose products. A beautiful patterned jar for the kitchen can be made from a regular glass jar or an empty coffee jar. Painted plates can be used for their intended purpose or used to decorate a wall.
Artistic Techniques
The more different elements there are in one work, the more interesting the result looks. Professional crafters use additional tools. For example, a dotting tool—a manicure tool consisting of a metal rod with a small ball tip. It helps turn dots into elongated drops or commas. It is most harmonious to alternate rows with small and large dots two by two. When choosing colors, it is better to stick to contrasting shades—it looks brighter and more visually appealing.
Decorating a Mug with Dot Painting
A great way to create an original gift for loved ones is to paint a regular mug. A suitable sketch or inscription is printed out and transferred to the ceramic using tracing paper and a soft graphite pencil. The applied line is covered with dots of the desired shade. Variations with a metallic effect, especially in gold and silver shades, look the most luxurious. The work is meticulous and requires perseverance, but a few minutes to under an hour is enough to trace a simple sketch.
Imitating Lace with Dot Painting
Lace dotting is a long and painstaking process. The drawing is transferred using carbon paper. One option is to outline the drawing first with a solid contour, then place dots in two rows, on one and the other side of the resulting stripe, as close to it as possible. The voids inside the pattern are filled with fine hatching or a grid, imitating threads. The result looks just like a napkin knitted with exquisite lace.
Dot painting is a simple way to decorate ordinary things with amazing art and get a unique item. Painted accessories and household items are perfectly suited for many styles in clothing and interior design: eclectic, oriental, hippie, boho, ethnic, country, kitsch, and others.