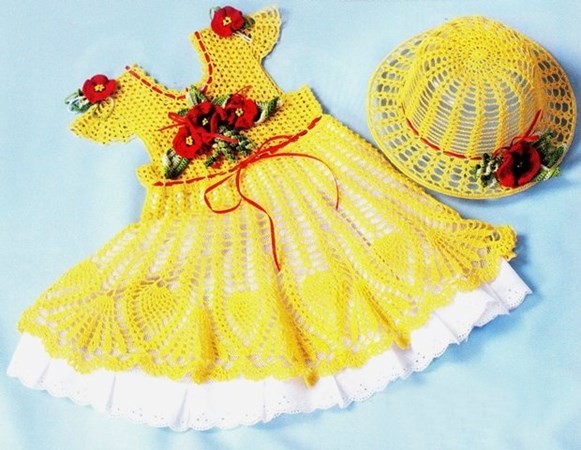
A cheerful yellow set for a girl — a dress and a hat. In this cute outfit your little daughter won’t be hot on a summer day, and the hat will perfectly protect her from the bright sun. Of course, if you like, you can choose yarn in any color.
Size: for a 1-year-old girl (chest circumference 52 cm).
You will need:
- 200 g of yellow yarn and a small amount of red, green, and black yarn for trim (100% cotton, 530 m/100 g);
- about 3 m of narrow red satin ribbon;
- yellow beads for flower centers;
- 1.5 mm crochet hook.
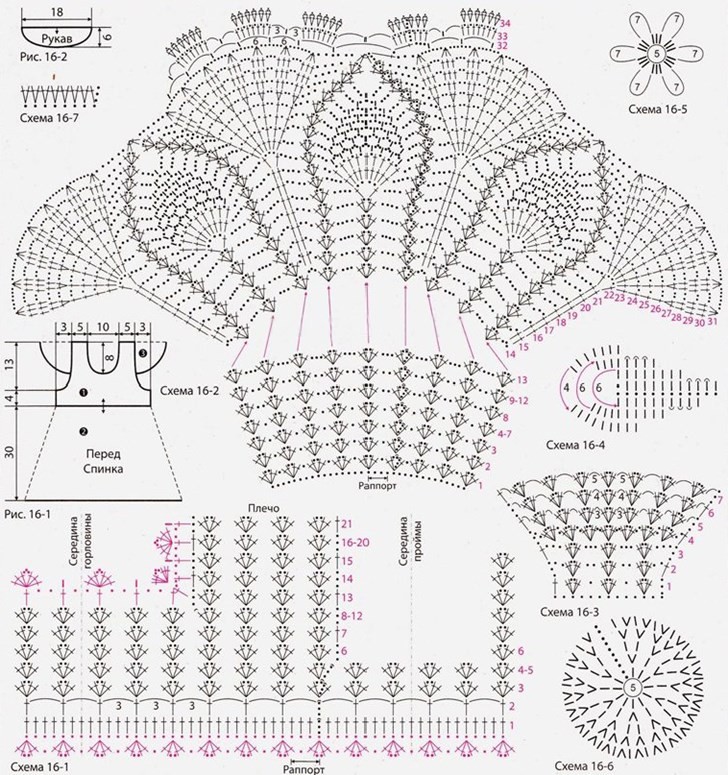
Bodice pattern: chart 16-1, shown in black. The chart shows rows worked back and forth. Marked with number 1 on the schematic.
Skirt pattern: chart 16-2. The chart shows rounds. Marked with number 2 on the schematic.
Wing sleeve pattern: chart 16-3. The chart shows rows worked back and forth. Marked with number 3 on the schematic.
Leaf motif: chart 16-4, worked in green yarn. You will need 3 motifs.
Poppy motif: made of 2 parts. Using chart 16-5, work the center in black yarn. Using chart 16-6, work the flower in red yarn. Place the finished pieces on top of each other and sew together. Decorate the centers with yellow beads. You will need 5 motifs.
Spiral motif: chart 16-7, worked in green yarn. You will need 5 motifs.
Dress
Description. Sizes, pattern placement, and direction of work are shown on the schematic (fig. 16-1, 16-2). First, the bodice is worked from the bottom up, then the skirt of the dress is worked from the top edge of the bodice downward. The work is done in stages.
First stage (bodice). The bodice pieces (back and front) are worked from the bottom up together as one piece without side seams. Work in rounds.
Chain 144 sts and continue working in pattern from chart 16-1 (36 repeats). Work in rounds using rows worked back and forth, so that the pattern on the right side of the fabric stays consistent. Position the turning line along the intended side seam. After 4 cm (in this version, 7 rows have been worked) from the starting edge, divide the piece into 3 sections (two fronts of 9 pattern repeats each, back – 18 repeats); you can mark them with pins. Work each section separately.
On the front piece, work evenly on the center side, and on the other side decrease 2 pattern repeats in one row to shape the armhole. Then continue working evenly. After 5 cm from the start of the armhole, shape the neckline by decreasing 3 pattern repeats in one row. Then work evenly, and at a height of 13 cm from the start of the armhole, finish working the front piece (4 pattern repeats). Work the second front piece the same way, but mirrored. Stitch decreases are shown on chart 16-1.
On the back piece, decrease 2 pattern repeats on each side in one row for the armholes. Then continue working evenly. After 5 cm from the start of the armhole, shape the neckline by decreasing 6 pattern repeats in one row at the center of the piece. Work each shoulder (4 pattern repeats) separately and evenly. At a height of 13 cm from the start of the armholes, finish working the shoulder. Work the second shoulder the same way. Sew the shoulder seams.
Second stage (skirt). From the lower edge of the finished bodice, work the skirt from top to bottom in pattern from chart 16-2 (36 repeats). Work in rounds without seams. How to work the first row is shown on chart 16-1 (the row is highlighted in red at the bottom). The chart shows stitch increases for widening the fabric (follow the row numbering carefully).
After working all the rows of the chart, finish the skirt.
Third stage (wing sleeves). Using chart 16-3, work 2 sleeves and sew them to the armholes on the dress (see schematic, fig. 16-1).
Fourth stage (finishing). Work a border around the neckline in pattern from chart 16-1 (highlighted in red). Thread a ribbon through the openings of the pattern along the line where the bodice meets the skirt, to gather it to the desired size. Thread a ribbon through the openings of the pattern around the neckline edge, to gather it to the desired size. Make 5 poppies, 3 leaves, 5 spirals, and two green cords (chains of ch sts) 50 cm each. See above for how to make the motifs. Once all the needed motifs are made, decorate the dress with them (see photo of the finished piece).
Hat
Size: head circumference 48 cm.
You will need: about 50 g of yellow yarn and a small amount of red, green, and black yarn for trim (100% cotton, 530 m/100 g), about 1 m of narrow red satin ribbon, yellow beads for flower centers, wire for shaping the hat brim, 1.5 mm crochet hook.
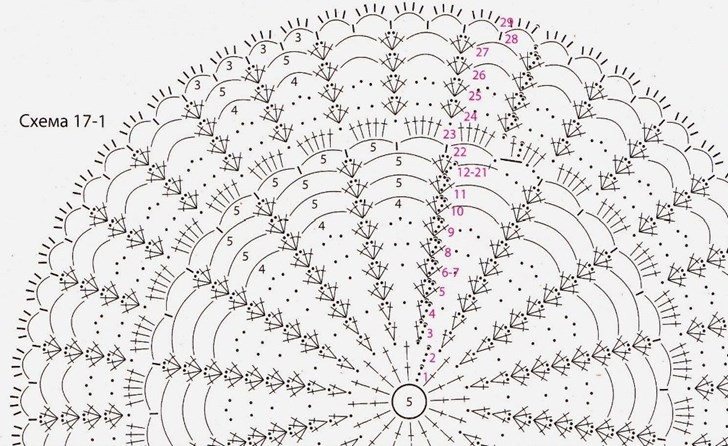
Hat pattern: chart 17-1. Worked from the center in rounds. The chart shows rounds.
Description
Start working from the crown and work in rounds without a seam in pattern from chart 17-1. Begin by working the bottom. Chain 5 sts, join the chain into a ring, ch 3, work 15 dc into the ring, and continue working in pattern following the rules for working in rounds. After working a circle 15 cm in diameter (10 rounds), start working the crown sides. Work evenly without increases in rounds in pattern from chart 17-1 (rounds 11 through 21). Now start working the brim of the hat. Work in pattern from chart 17-1 (rounds 22 through 29). While working the last round, lay in the wire and work the stitches around it to enclose it.
Starch the hat well and let it dry on a special form or a jar of a suitable size. Make sure the brim stays flat and spread out the whole time it dries.
Make 1 poppy, 3 leaves, 3 spirals (see the dress instructions) and decorate the hat with them. Thread a ribbon through the openings of the pattern along the line where the crown meets the brim, to gather it to the desired size.